Test SSO flow
Validate your Single Sign-On implementation using the IdP Simulator or real identity providers like Okta
After implementing Single Sign-On using our Quickstart guide, you need to validate your integration for all possible scenarios. This guide shows you how to test your SSO implementation using two approaches:
- IdP Simulator (quick testing): Test all SSO scenarios without external services. Your development environment includes a pre-configured test organization with an SSO connection to our IdP Simulator.
- Real identity provider (production-ready testing): Test with actual identity providers like Okta or Microsoft Entra ID to simulate real customer scenarios.
To ensure a successful SSO implementation, test all three scenarios described in this guide before deploying to production: SP-initiated SSO, IdP-initiated SSO, and error handling.
Testing with IdP Simulator Quick testing
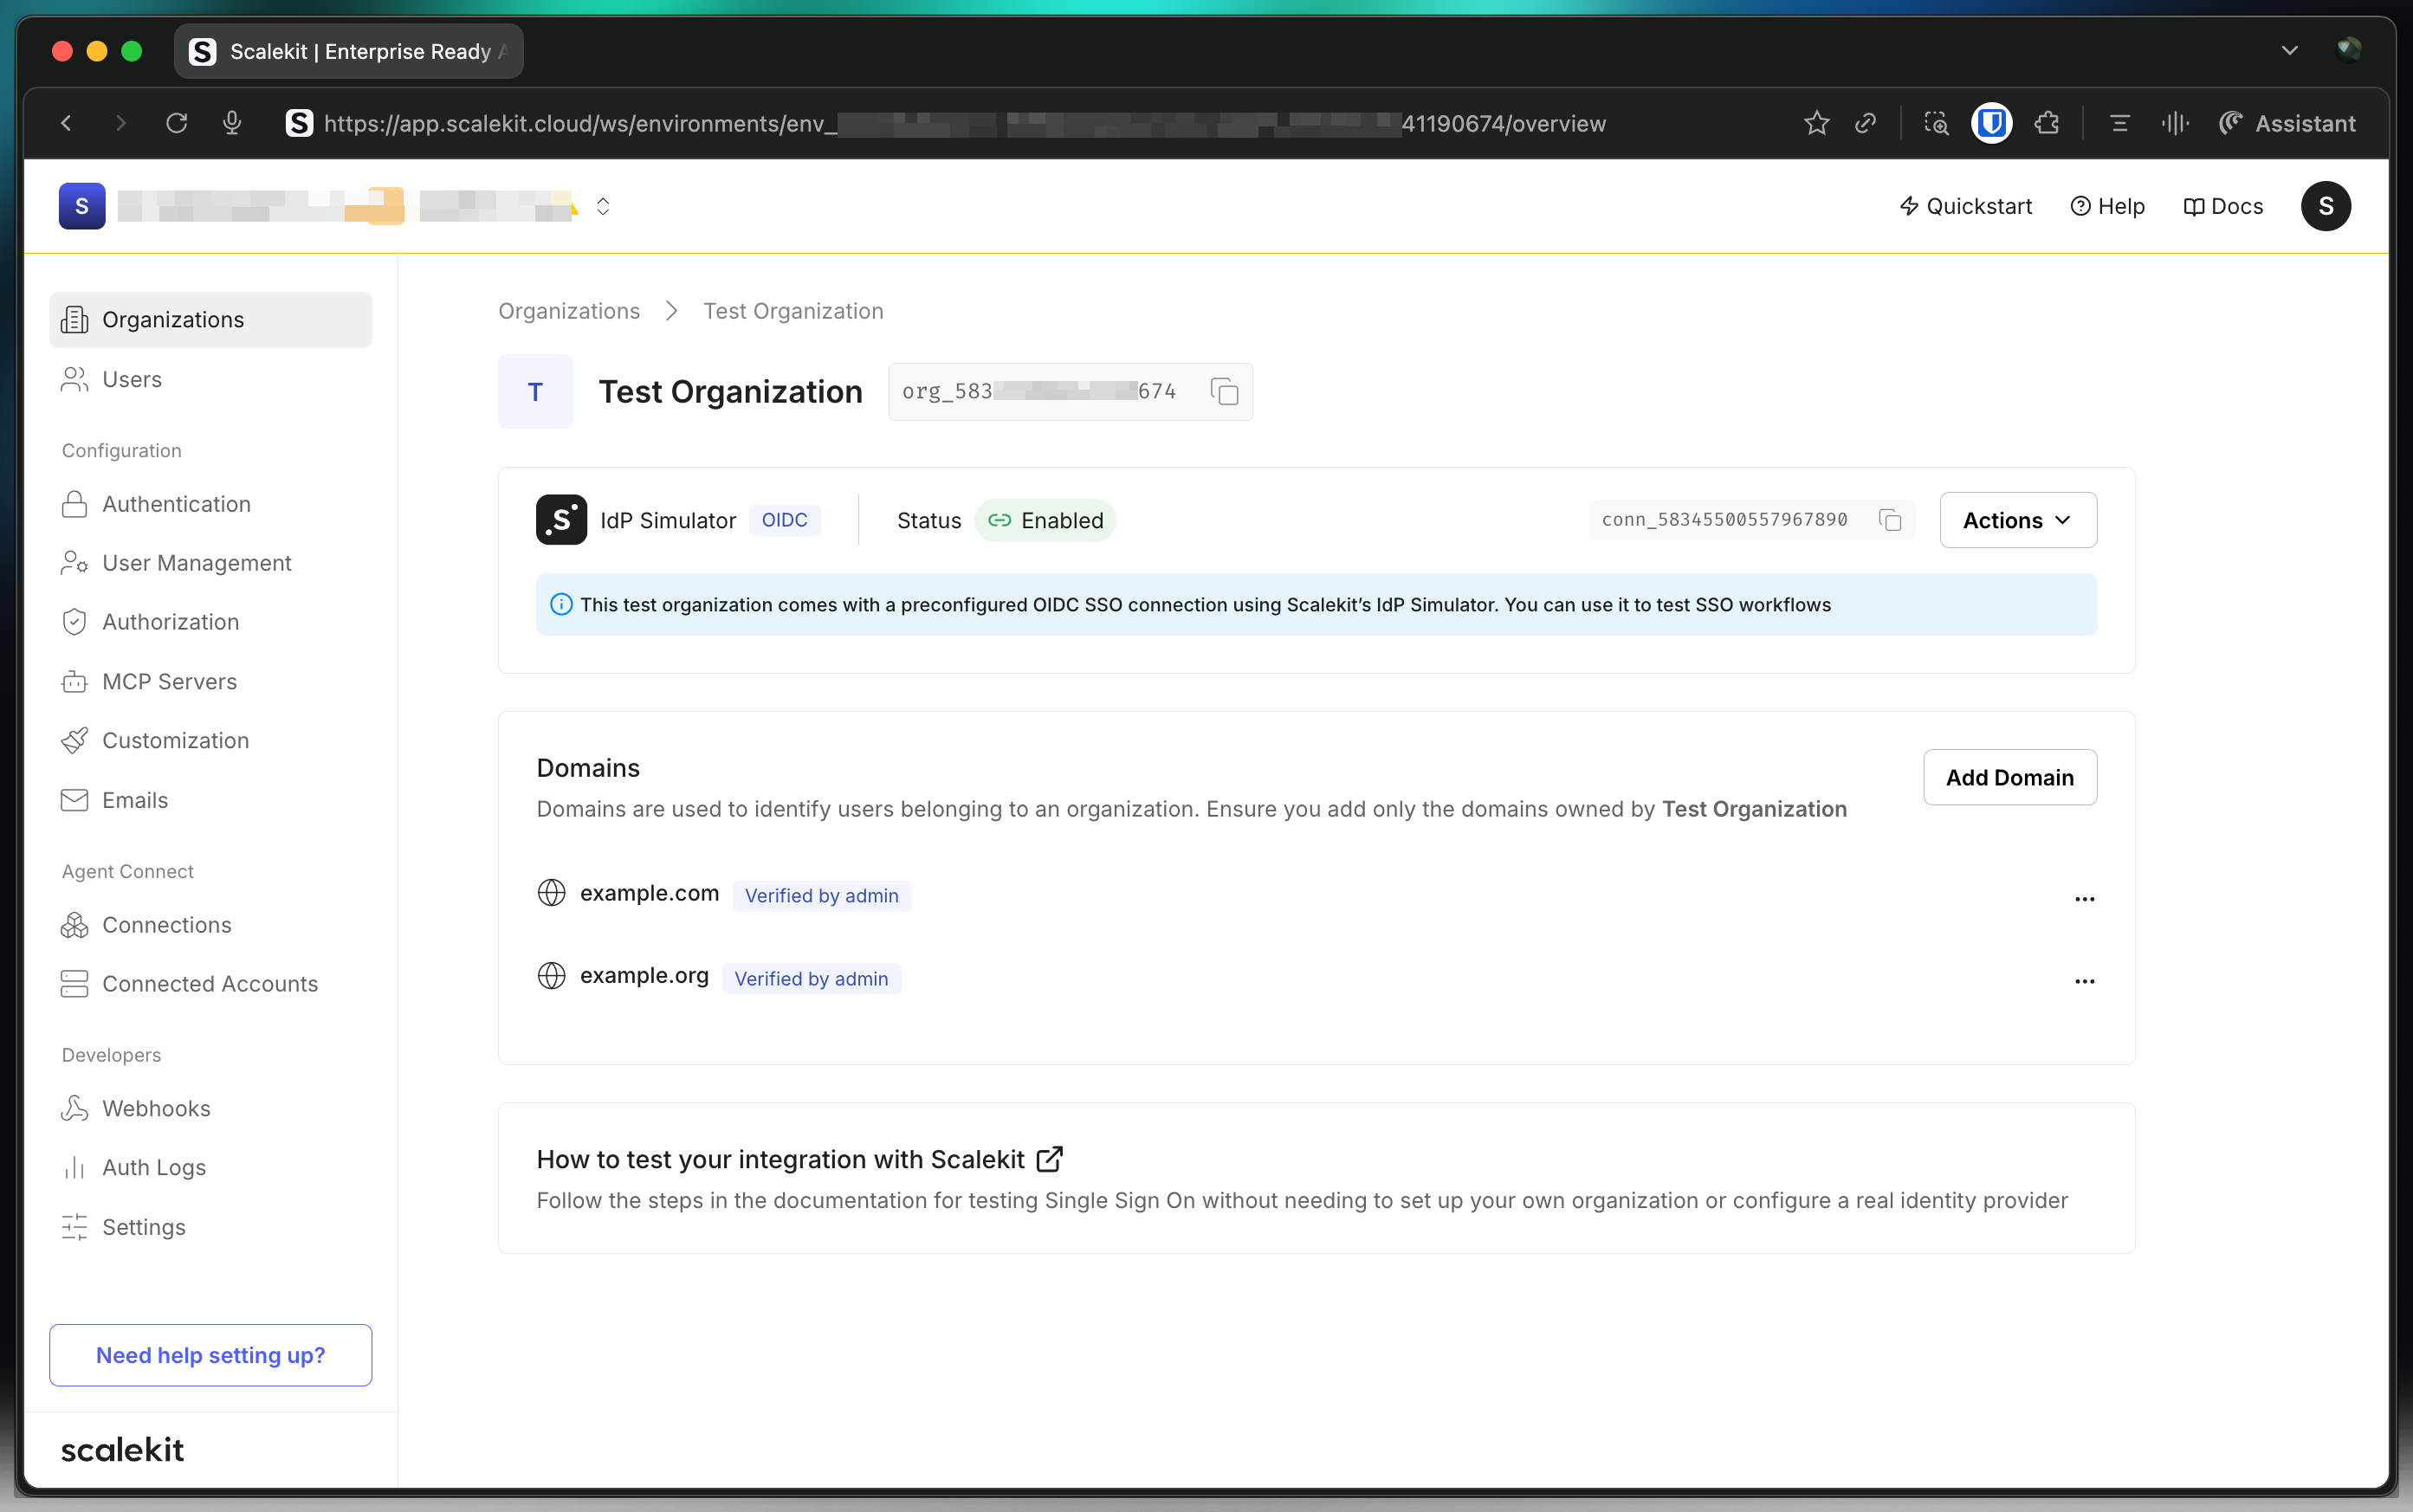
Section titled “Testing with IdP Simulator ”The IdP Simulator allows you to test all SSO scenarios without requiring external services. Your development environment includes a pre-configured test organization with an SSO connection to our IdP Simulator and test domains like @example.com or @example.org.
To locate the test organization, navigate to Dashboard > Organizations and select Test Organization.
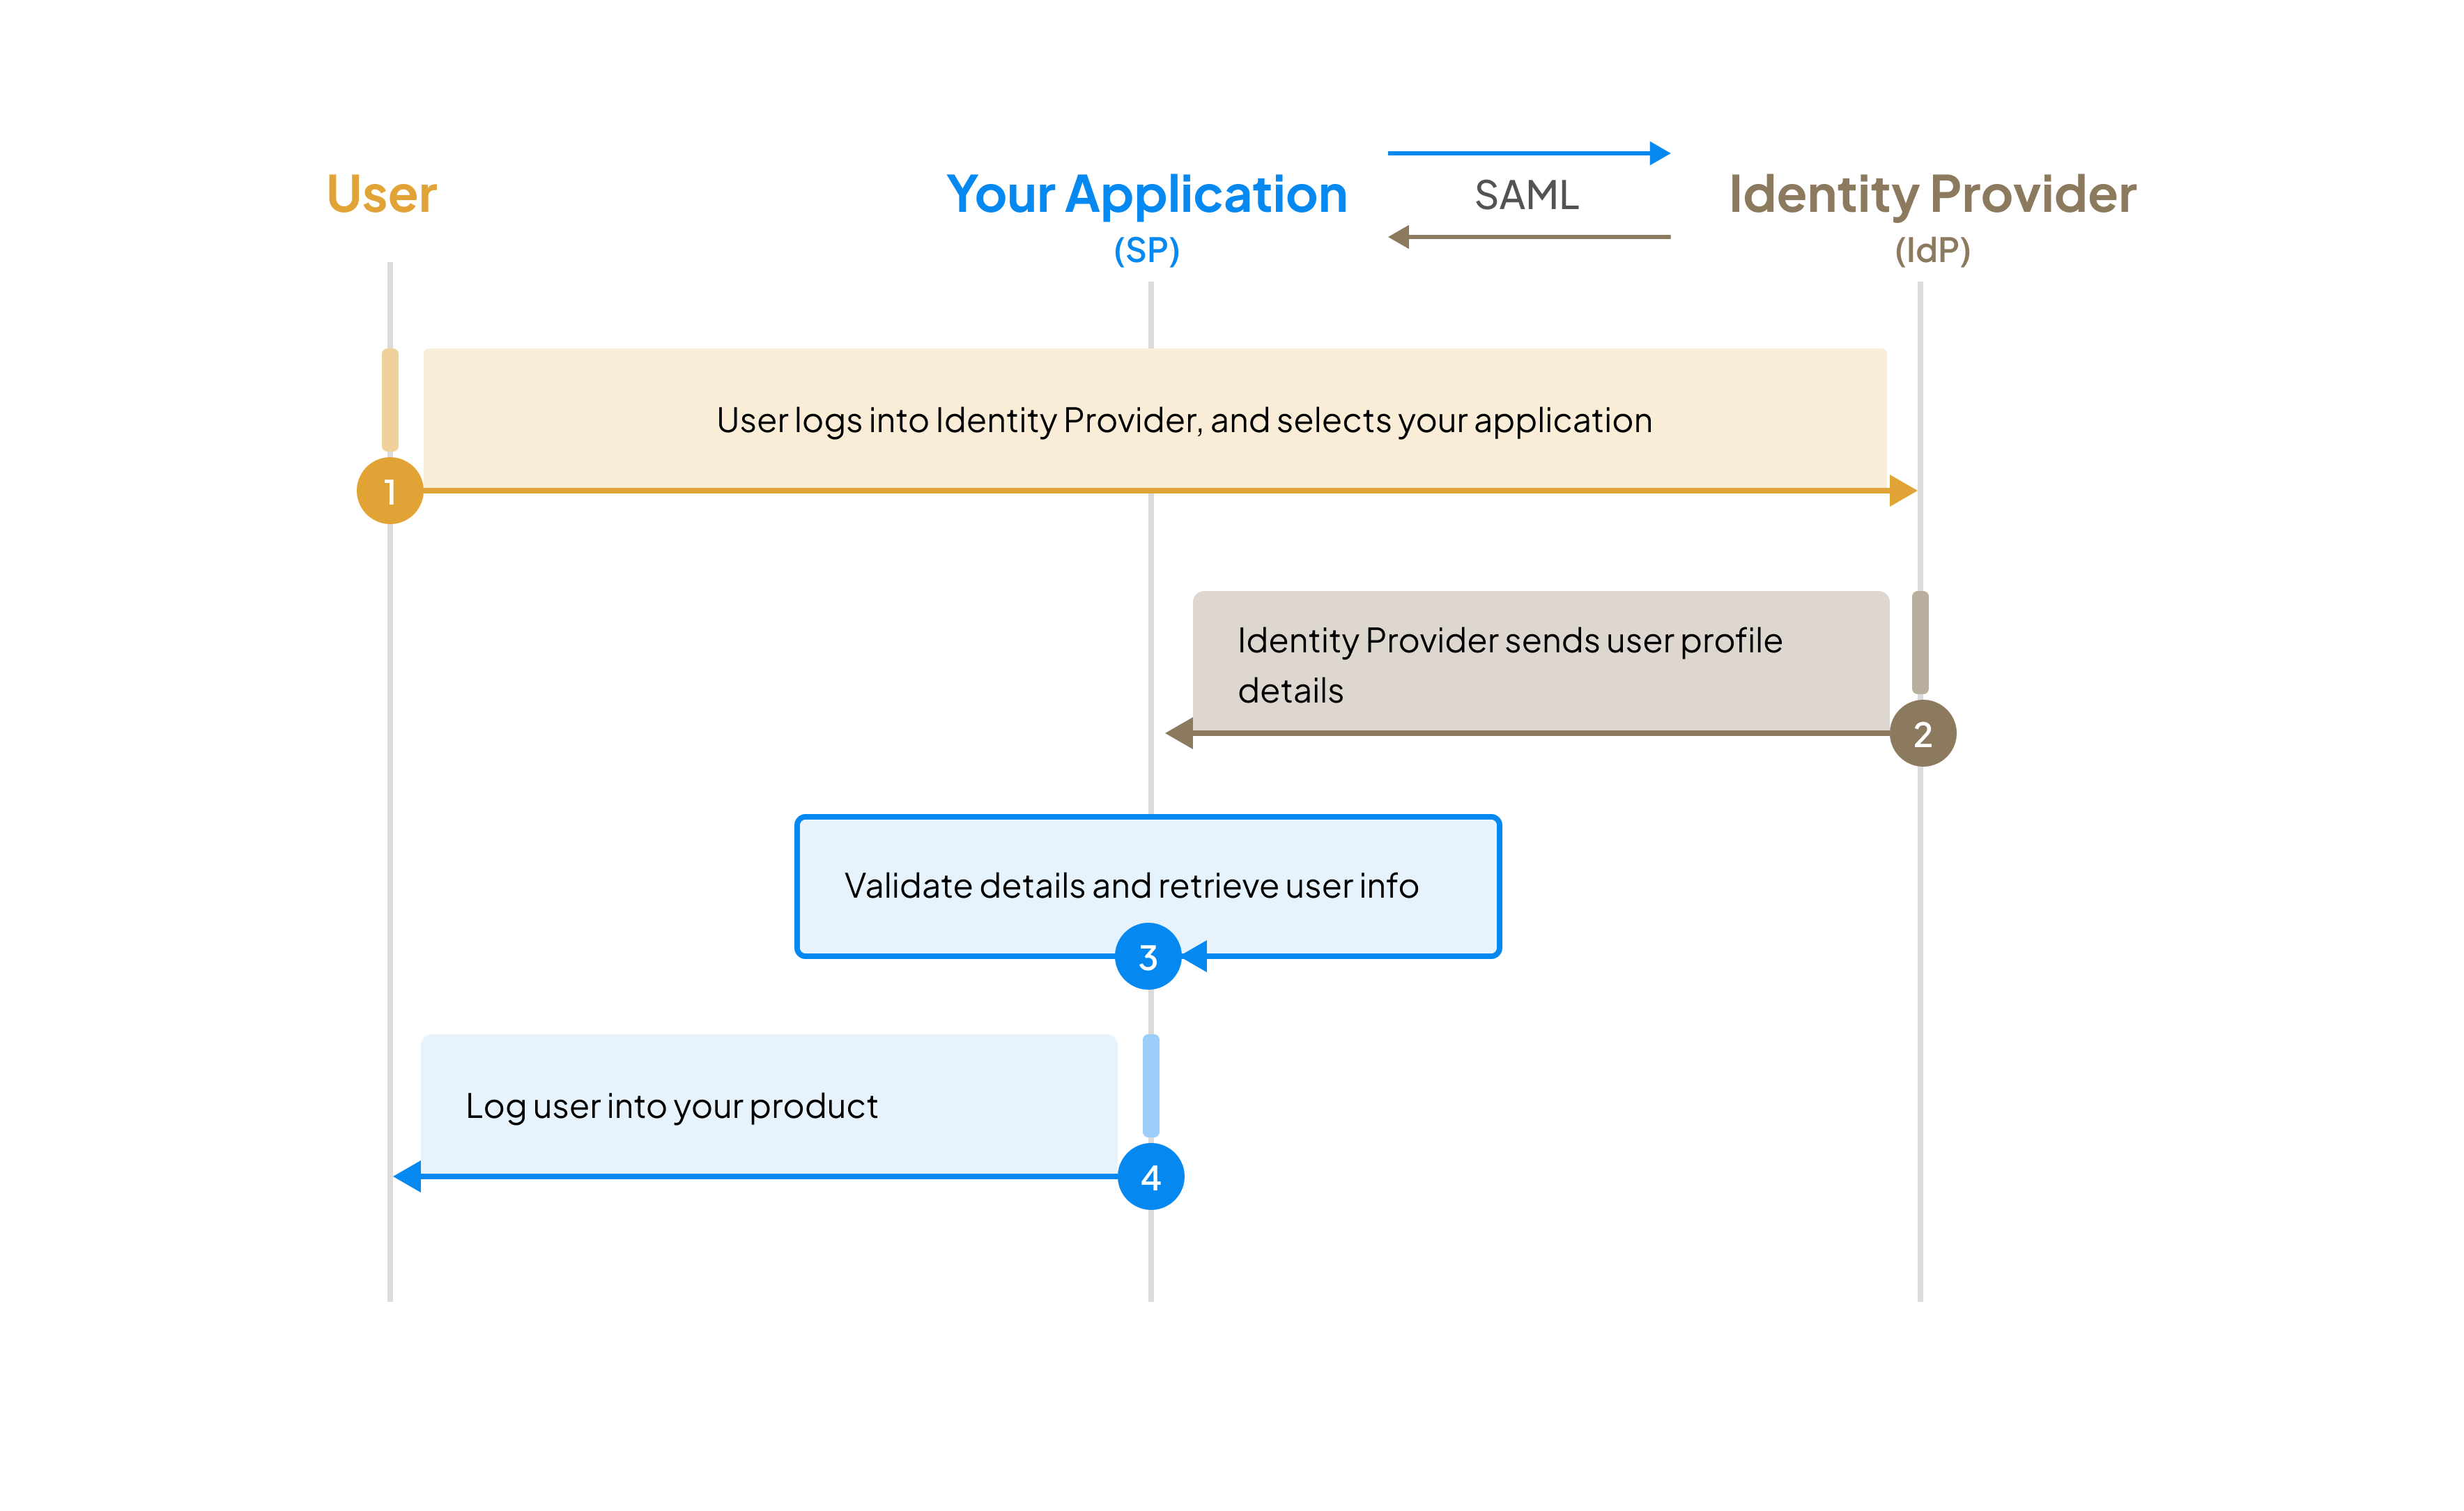
Service provider (SP) initiated SSO Scenario 1
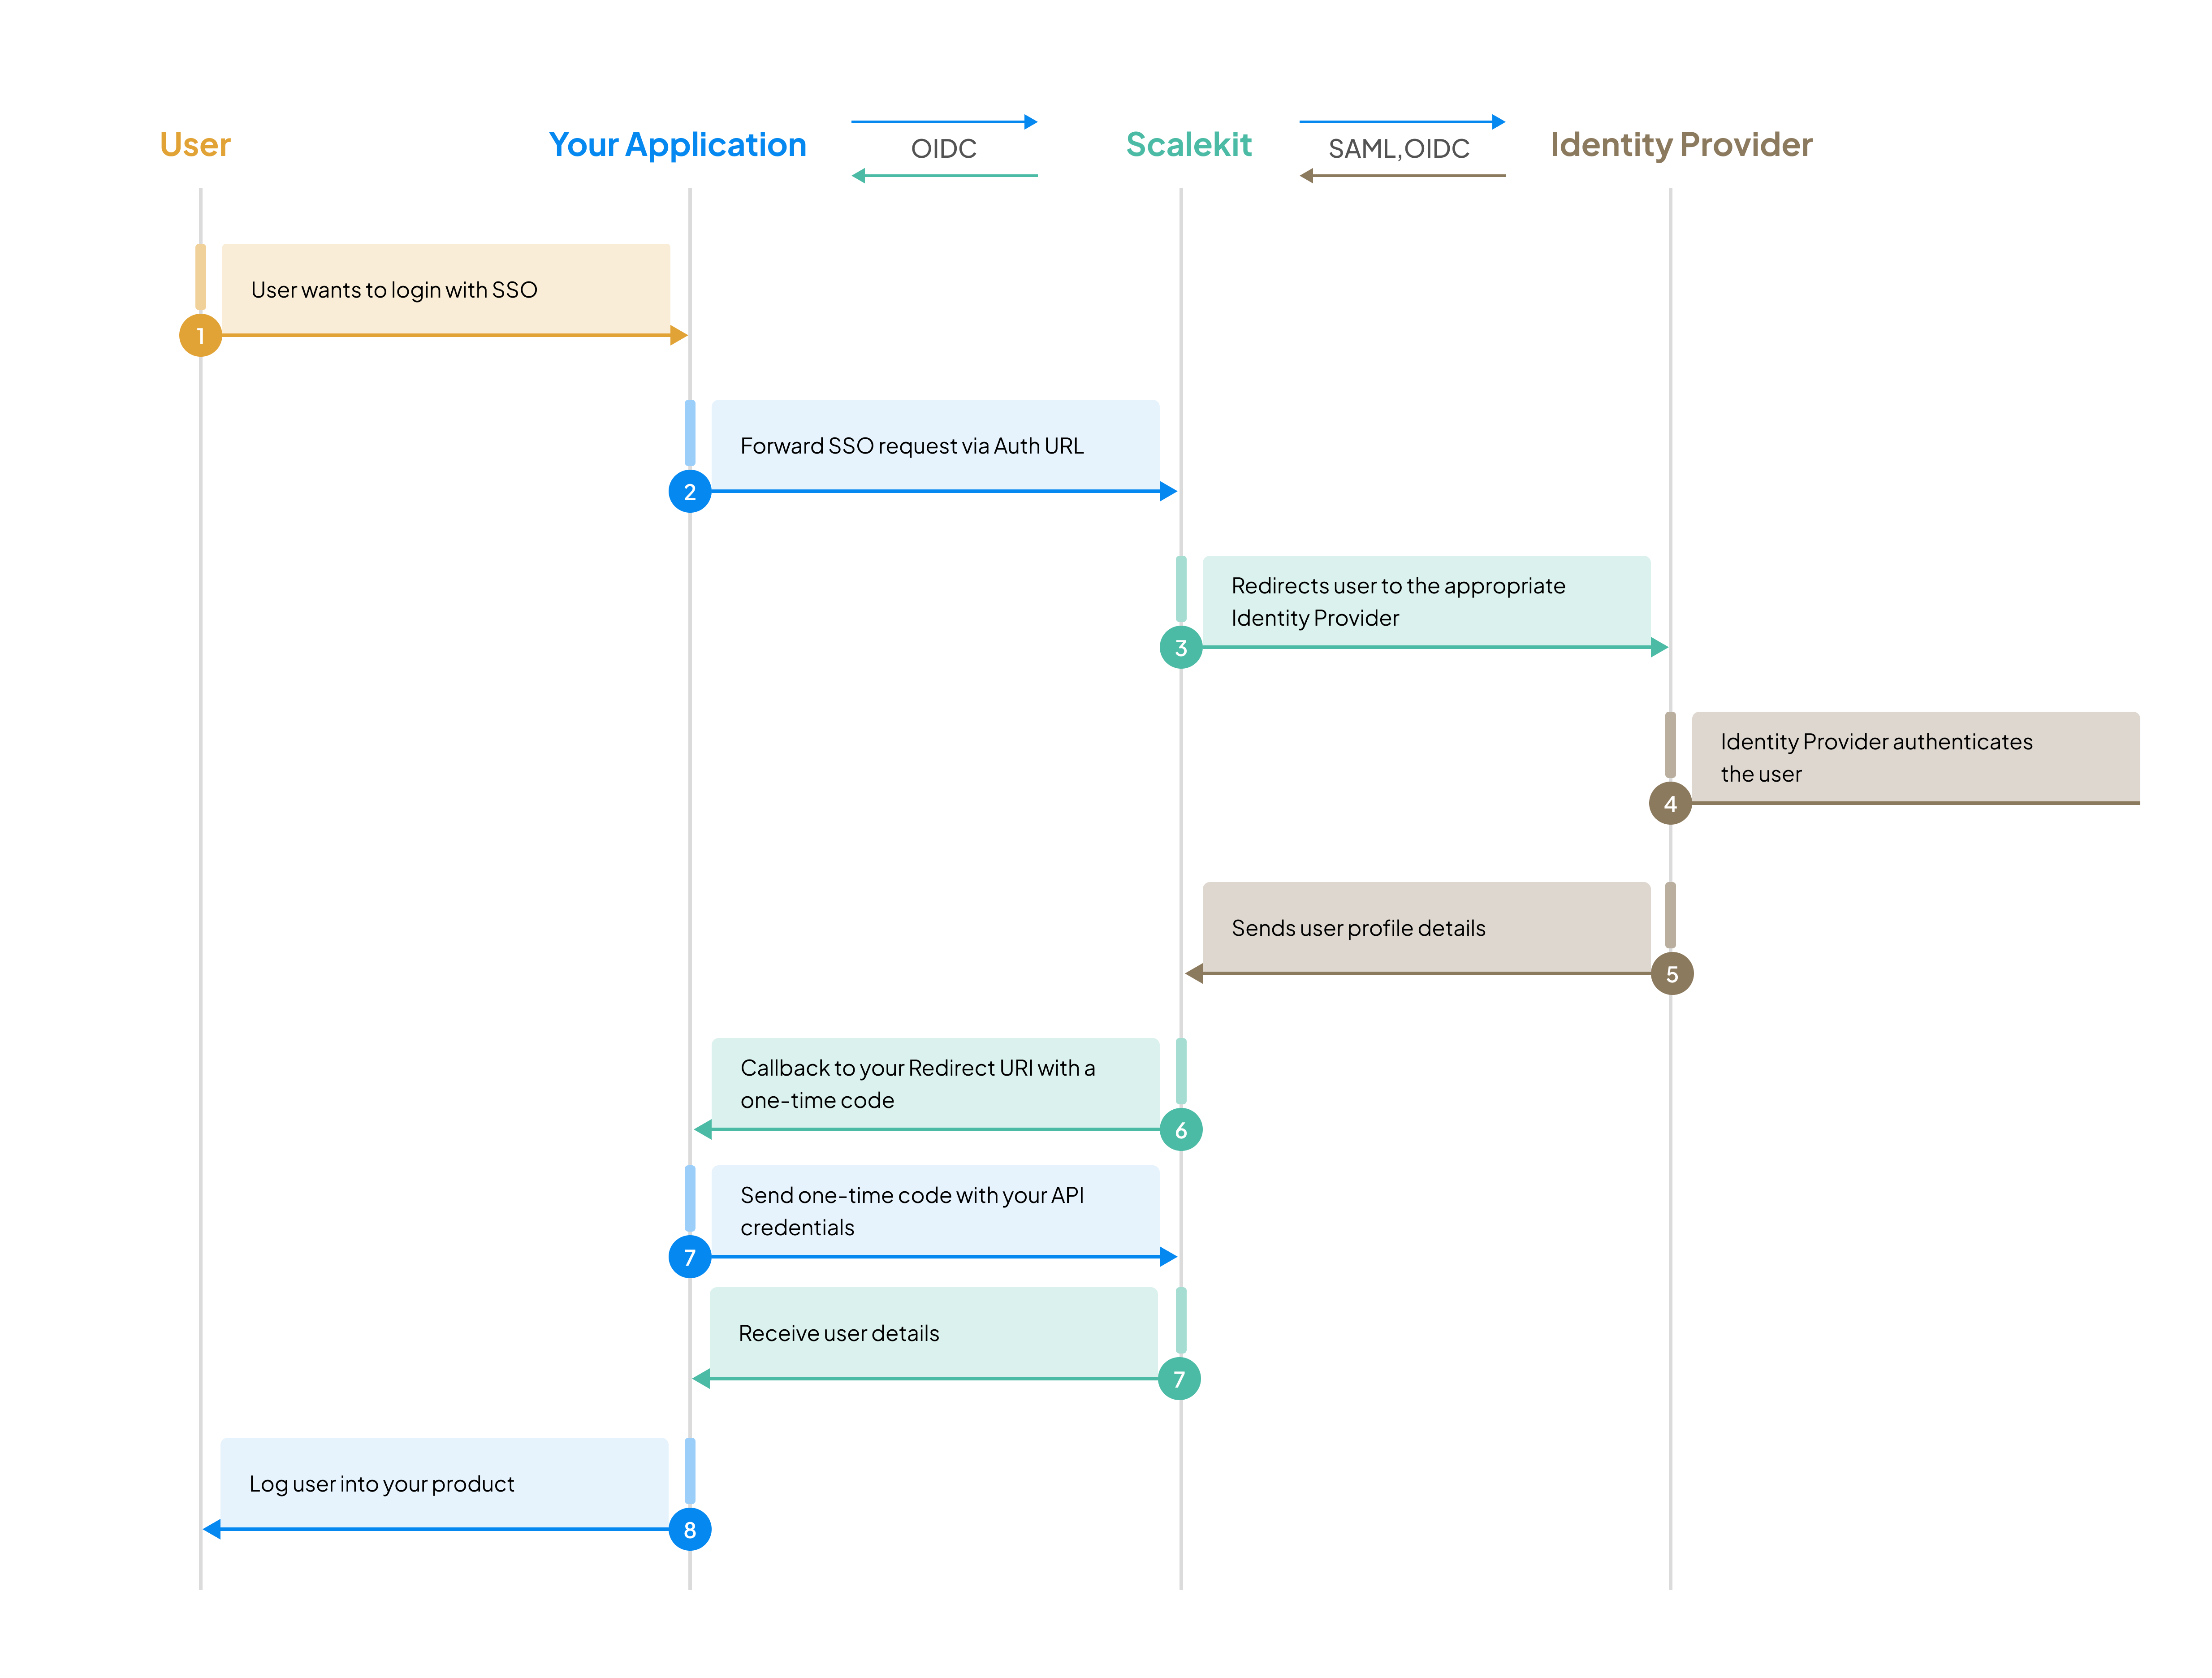
Section titled “Service provider (SP) initiated SSO ”In this common scenario, users start the Single Sign-On process from your application’s login page.
Generate authorization URL
Section titled “Generate authorization URL”Generate an authorization URL with your test organization ID. This redirects users to Scalekit’s hosted login page, which will then redirect to the IdP Simulator.
// Use your test organization ID from the dashboardconst options = { organizationId: 'org_32656XXXXXX0438' // Replace with your test organization ID};
// Generate Authorization URL that redirects to IdP Simulatorconst authorizationURL = scalekit.getAuthorizationUrl(redirectUrl, options);
// Redirect user to start SSO flowres.redirect(authorizationURL);# Use your test organization ID from the dashboardoptions = { "organizationId": 'org_32656XXXXXX0438' # Replace with your test organization ID}
# Generate Authorization URL that redirects to IdP Simulatorauthorization_url = scalekit_client.get_authorization_url( redirect_url, options,)
# Redirect user to start SSO flowreturn redirect(authorization_url)// Use your test organization ID from the dashboardoptions := scalekit.AuthorizationUrlOptions{ OrganizationId: "org_32656XXXXXX0438", // Replace with your test organization ID}
// Generate Authorization URL that redirects to IdP SimulatorauthorizationURL := scalekitClient.GetAuthorizationUrl( redirectUrl, options,)
// Redirect user to start SSO flowc.Redirect(http.StatusFound, authorizationURL)// Use your test organization ID from the dashboardAuthorizationUrlOptions options = new AuthorizationUrlOptions();options.setOrganizationId("org_32656XXXXXX0438"); // Replace with your test organization ID
// Generate Authorization URL that redirects to IdP SimulatorString authorizationURL = scalekitClient .authentication() .getAuthorizationUrl(redirectUrl, options) .toString();
// Redirect user to start SSO flowreturn "redirect:" + authorizationURL;Test the SSO flow
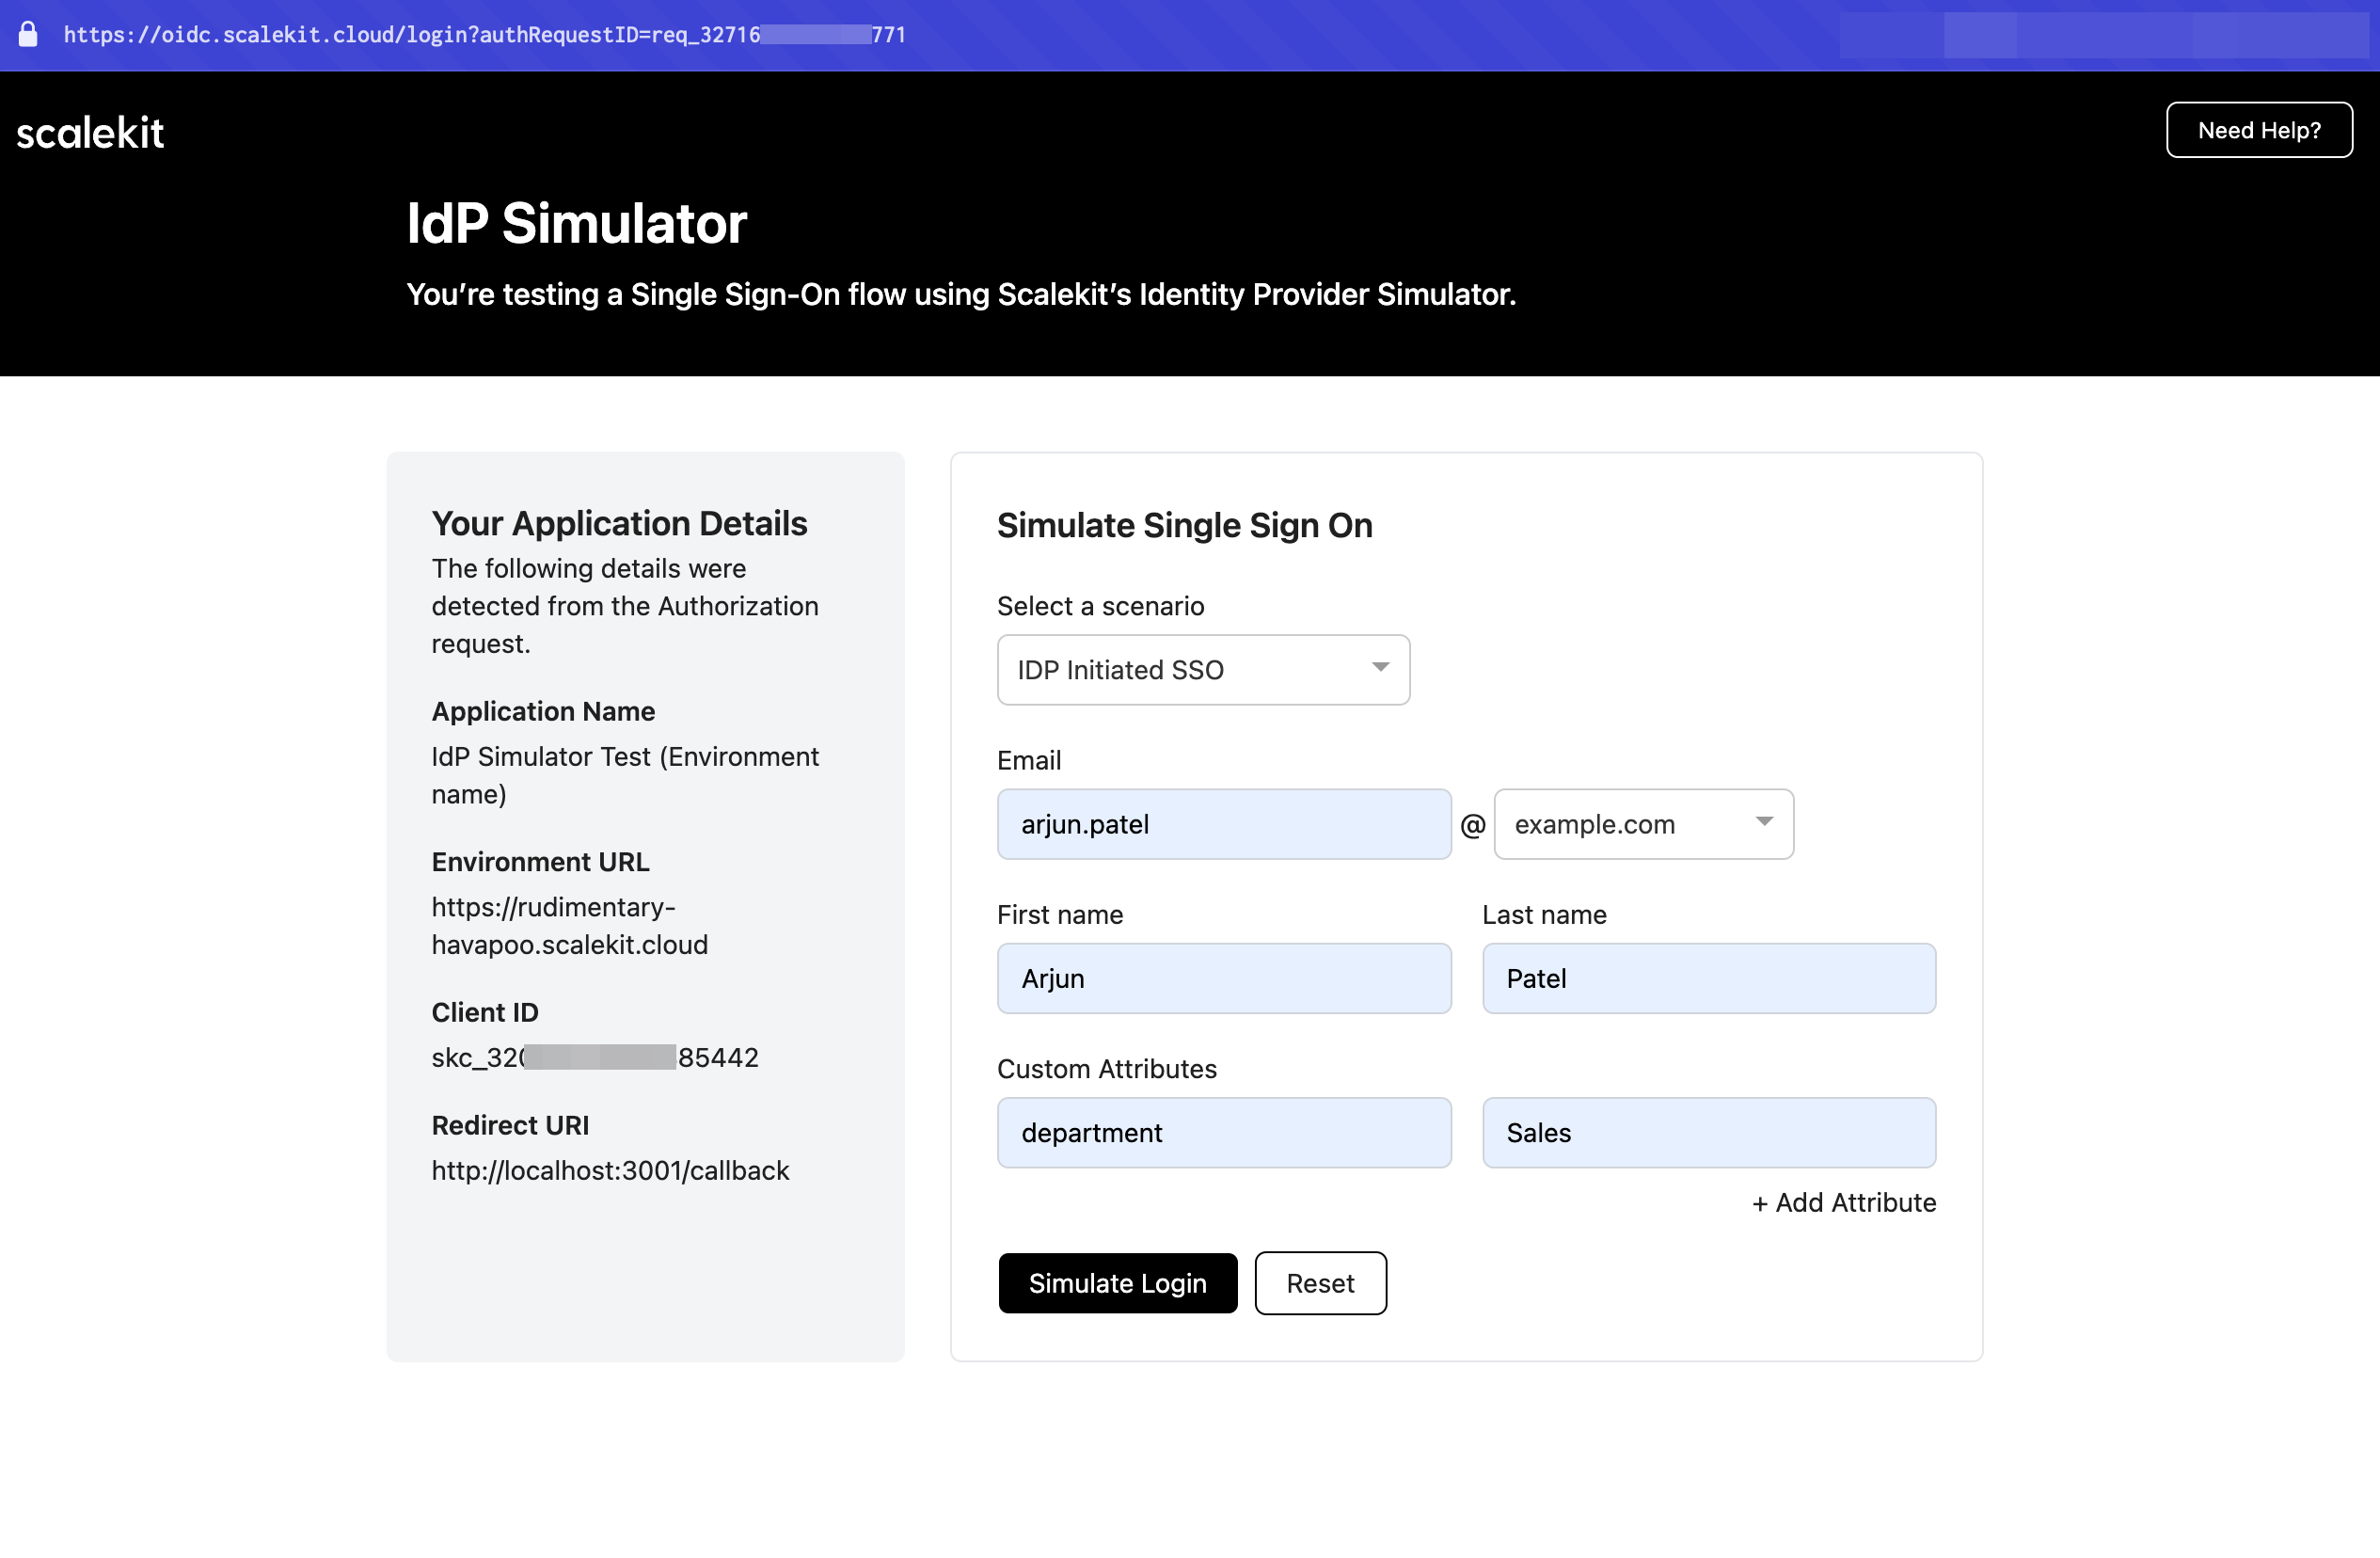
Section titled “Test the SSO flow”After generating the authorization URL, users are redirected to the IdP Simulator:
- Select User login via SSO from the dropdown menu
- Enter test user details (email, name, etc.) to simulate authentication
- Click Submit to complete the simulation
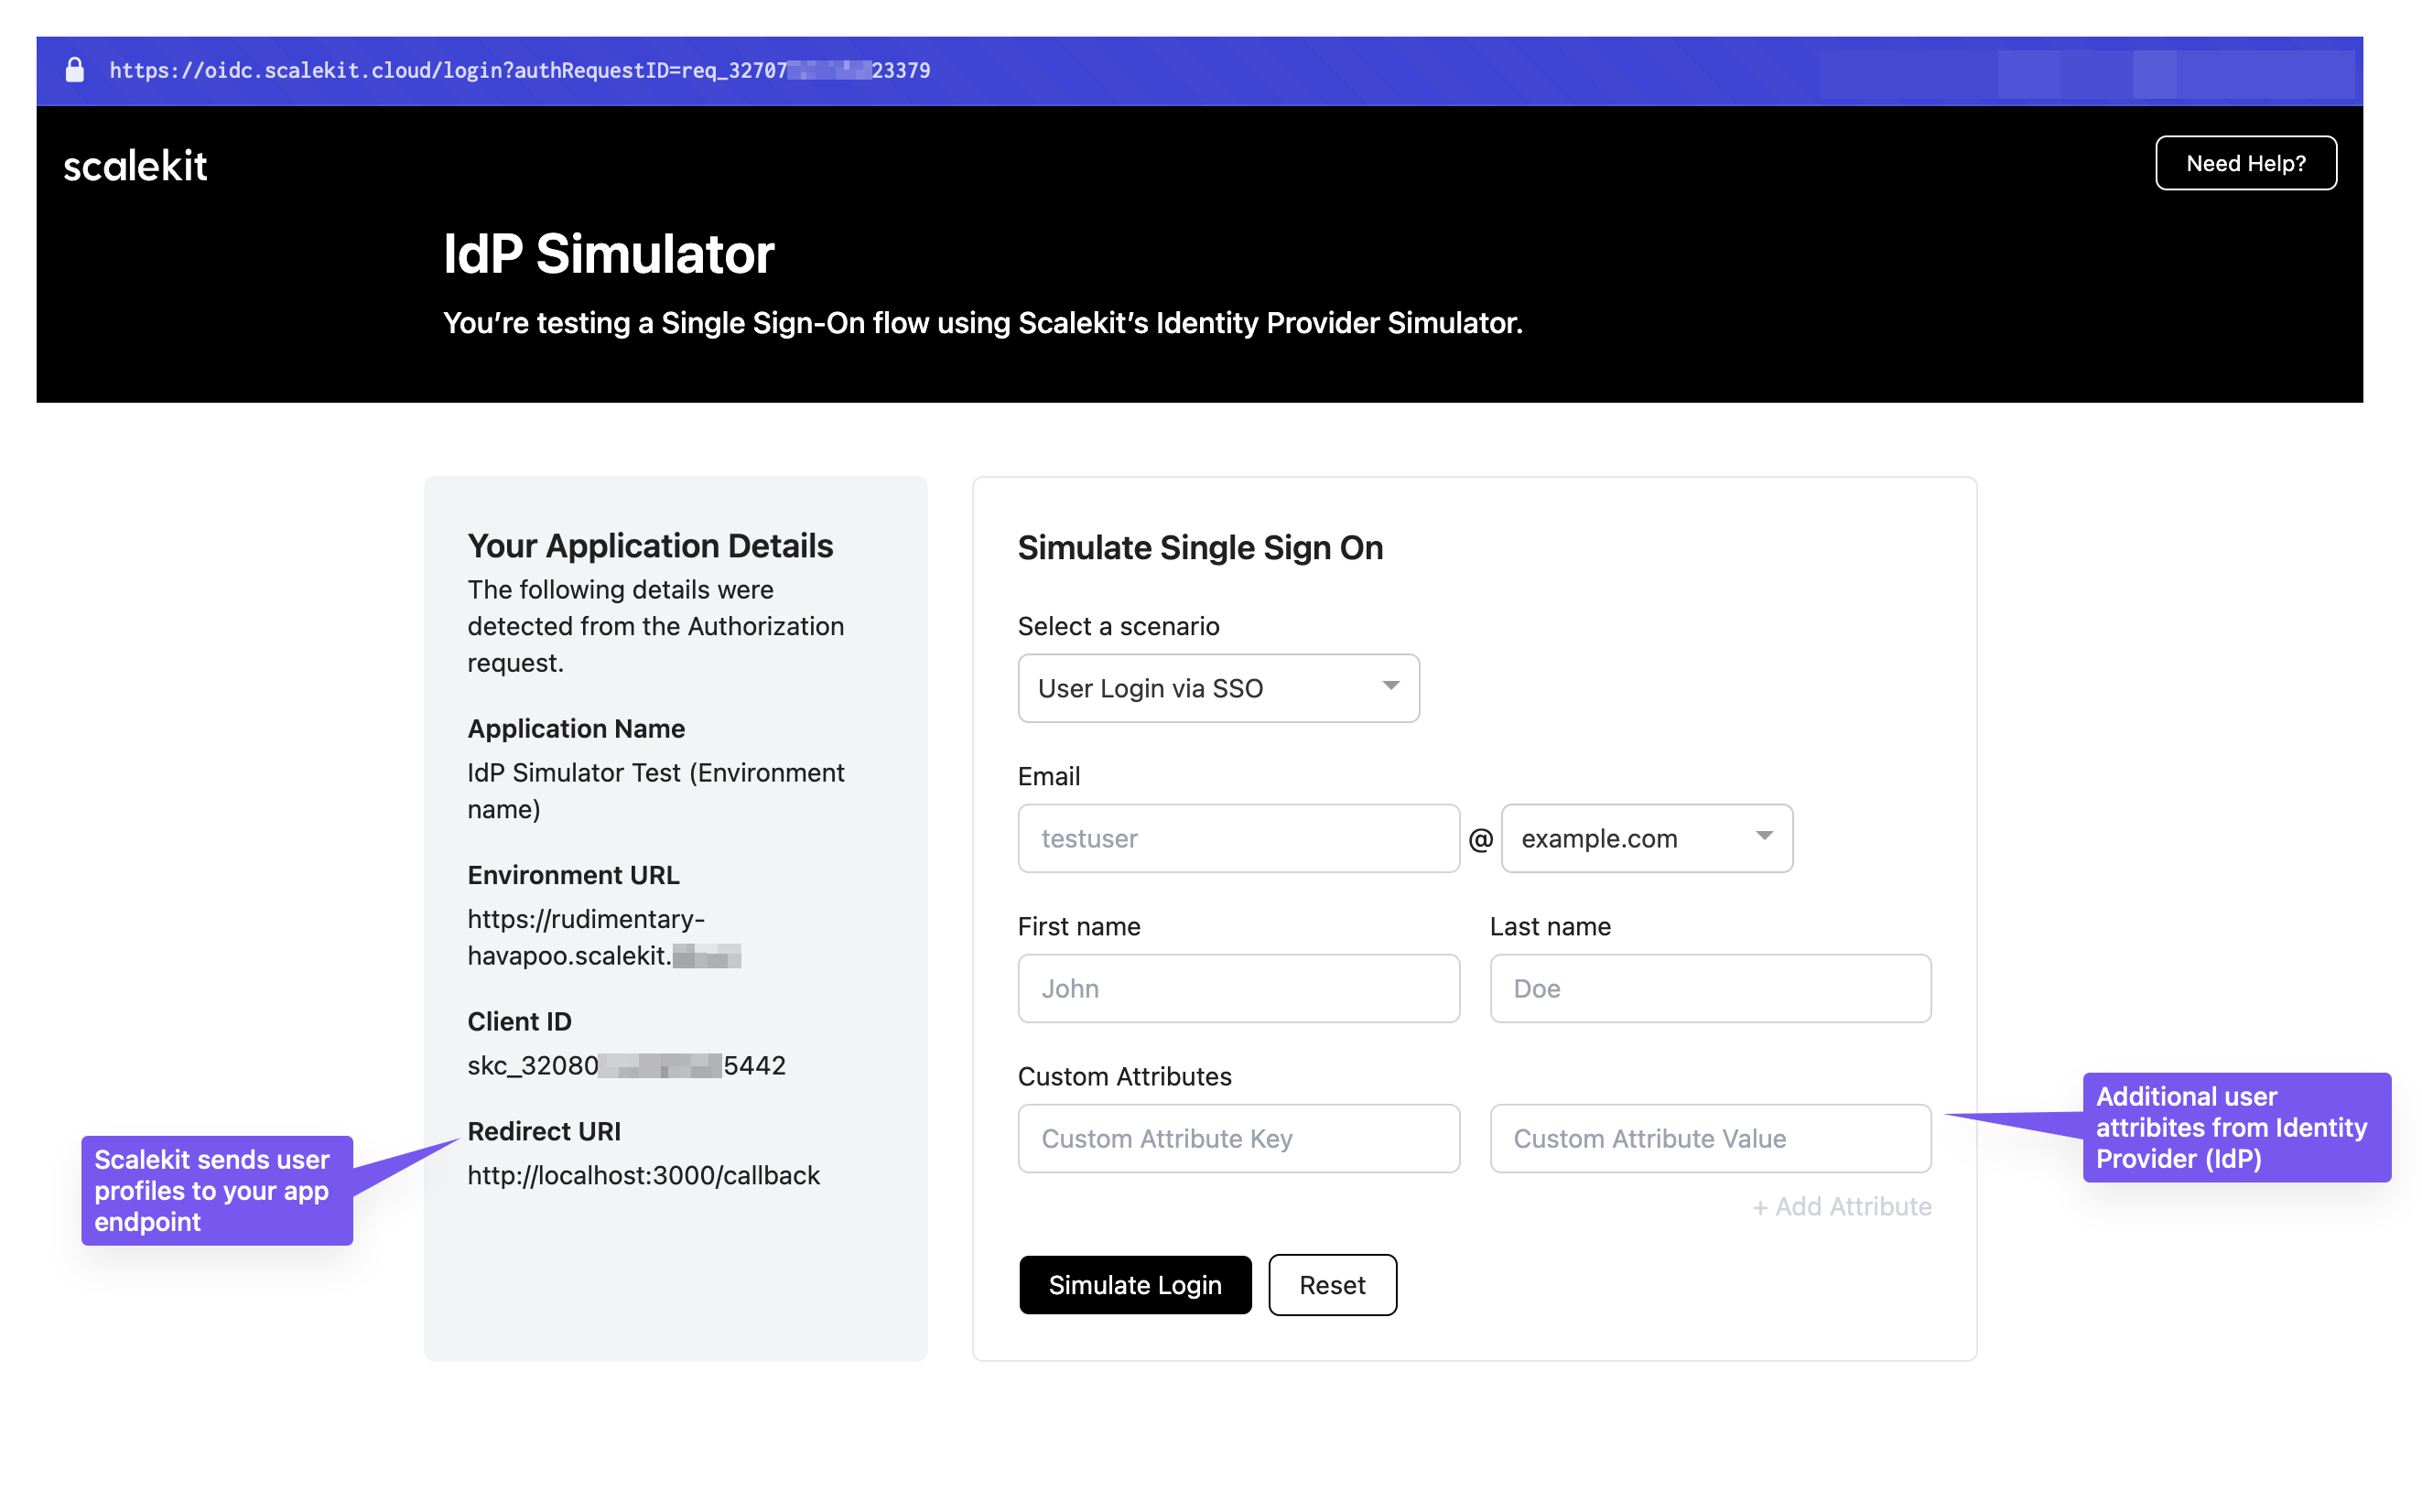
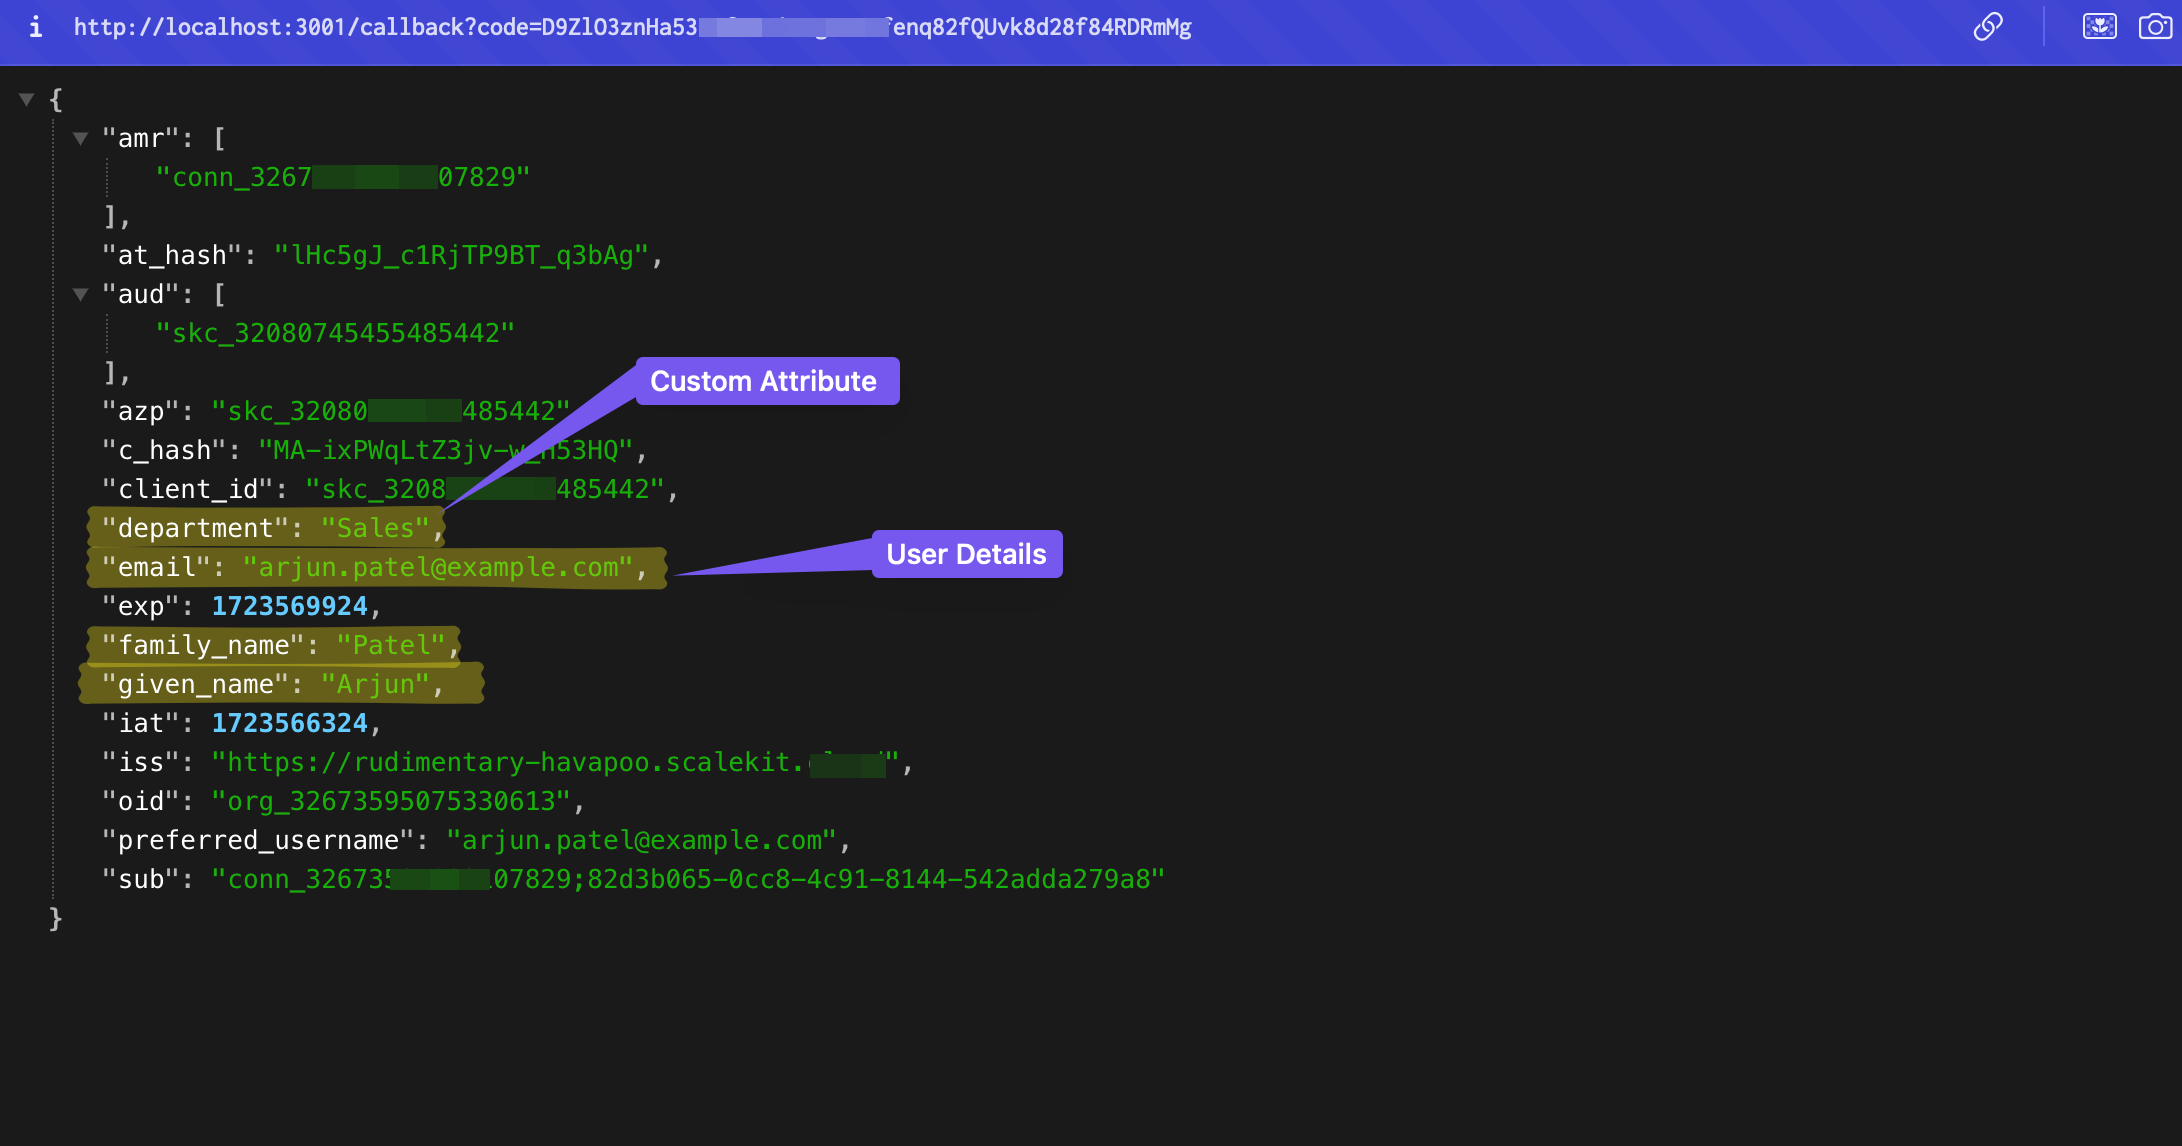
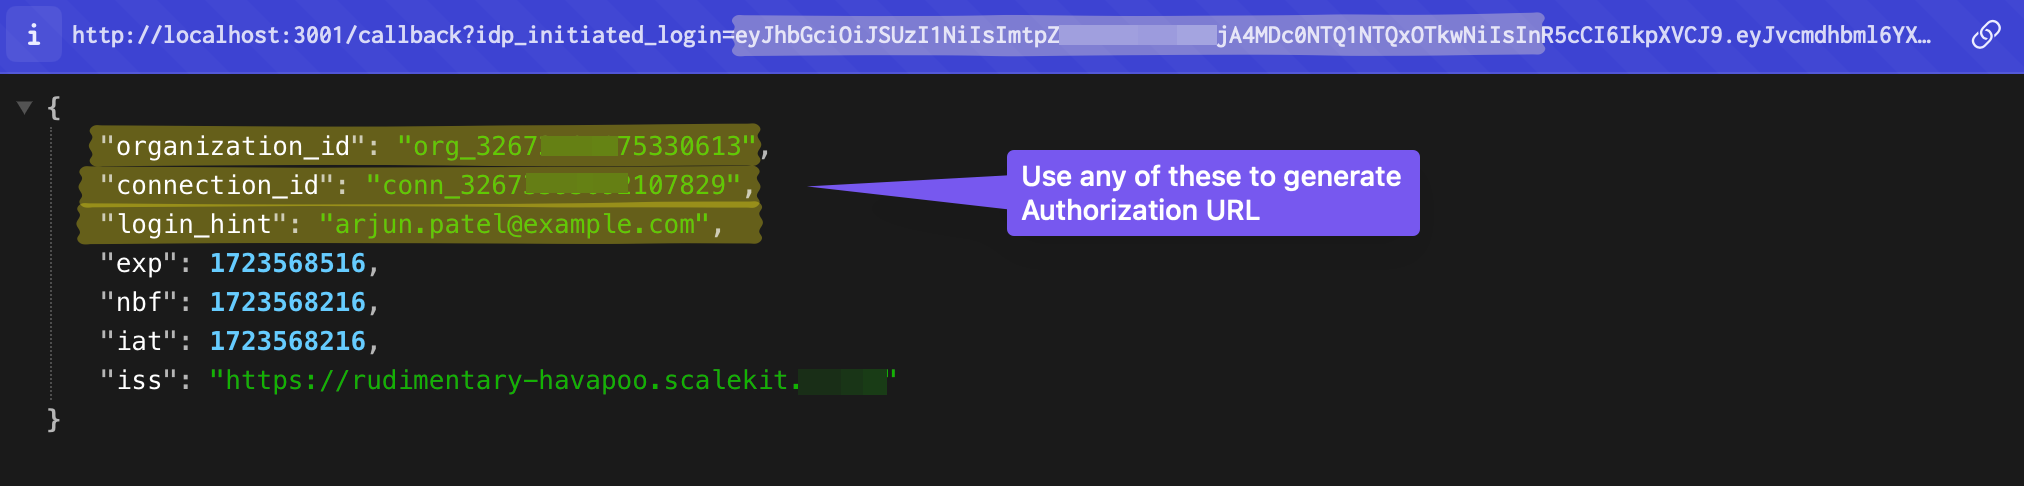
After submitting the form, your application receives an idToken containing the user details you entered:
Identity provider (IdP) initiated SSO Scenario 2
Section titled “Identity provider (IdP) initiated SSO ”In this scenario, users start the sign-in process from their identity provider (typically through an applications catalog) rather than from your application’s login page. Your application must handle this flow by detecting IdP-initiated requests and converting them to SP-initiated SSO.
If you haven’t implemented IdP-initiated SSO yet, follow our IdP-initiated SSO implementation guide before testing this scenario.
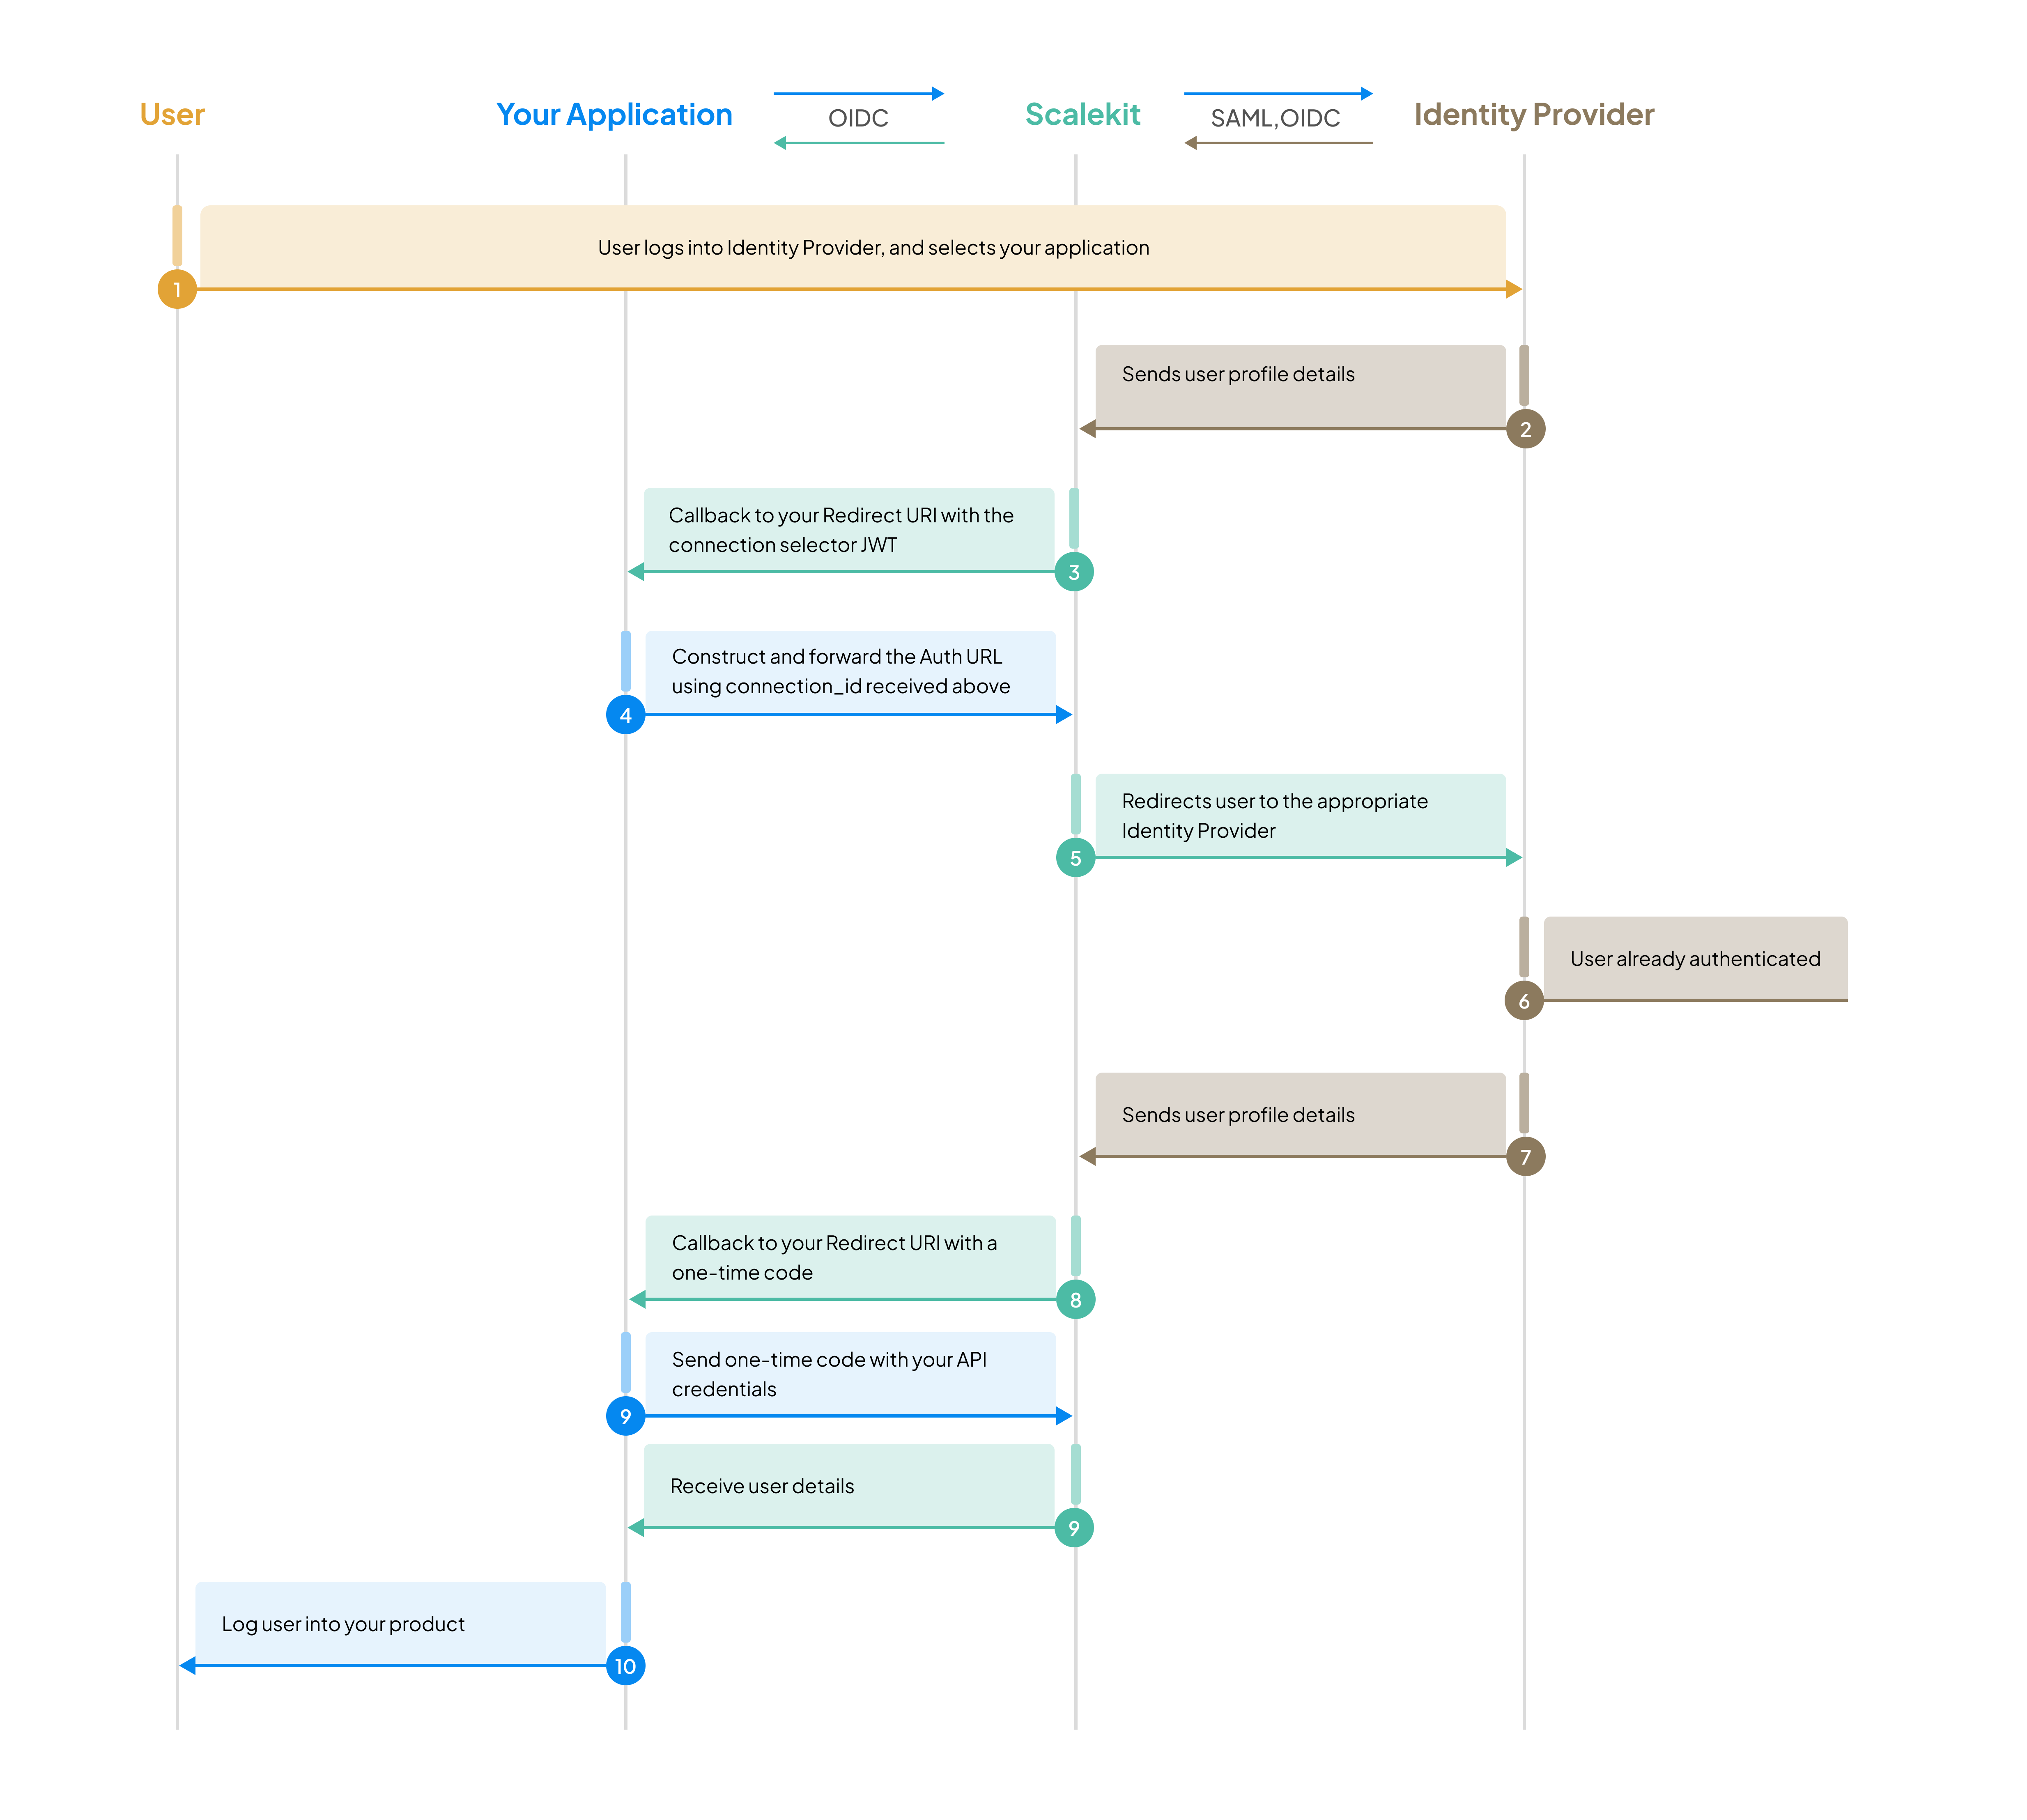
Test IdP-initiated SSO flow
Section titled “Test IdP-initiated SSO flow”- Generate the authorization URL using your test organization
- When redirected to the IdP Simulator, select IdP initiated SSO from the dropdown menu
- Enter test user details to simulate the login
- Click Submit to complete the simulation
Verify callback handling
Section titled “Verify callback handling”Your callback handler receives the IdP-initiated request and must process it correctly:
Your application should:
- Detect the IdP-initiated request based on the request parameters
- Retrieve connection details (
connection_idororganization_id) from Scalekit - Generate a new authorization URL to convert the IdP-initiated flow to SP-initiated SSO
- Complete the authentication flow
Error handling Scenario 3
Section titled “Error handling ”Your application should gracefully handle error scenarios to provide a good user experience. SSO failures can occur due to misconfiguration, incomplete user profiles, or integration issues.
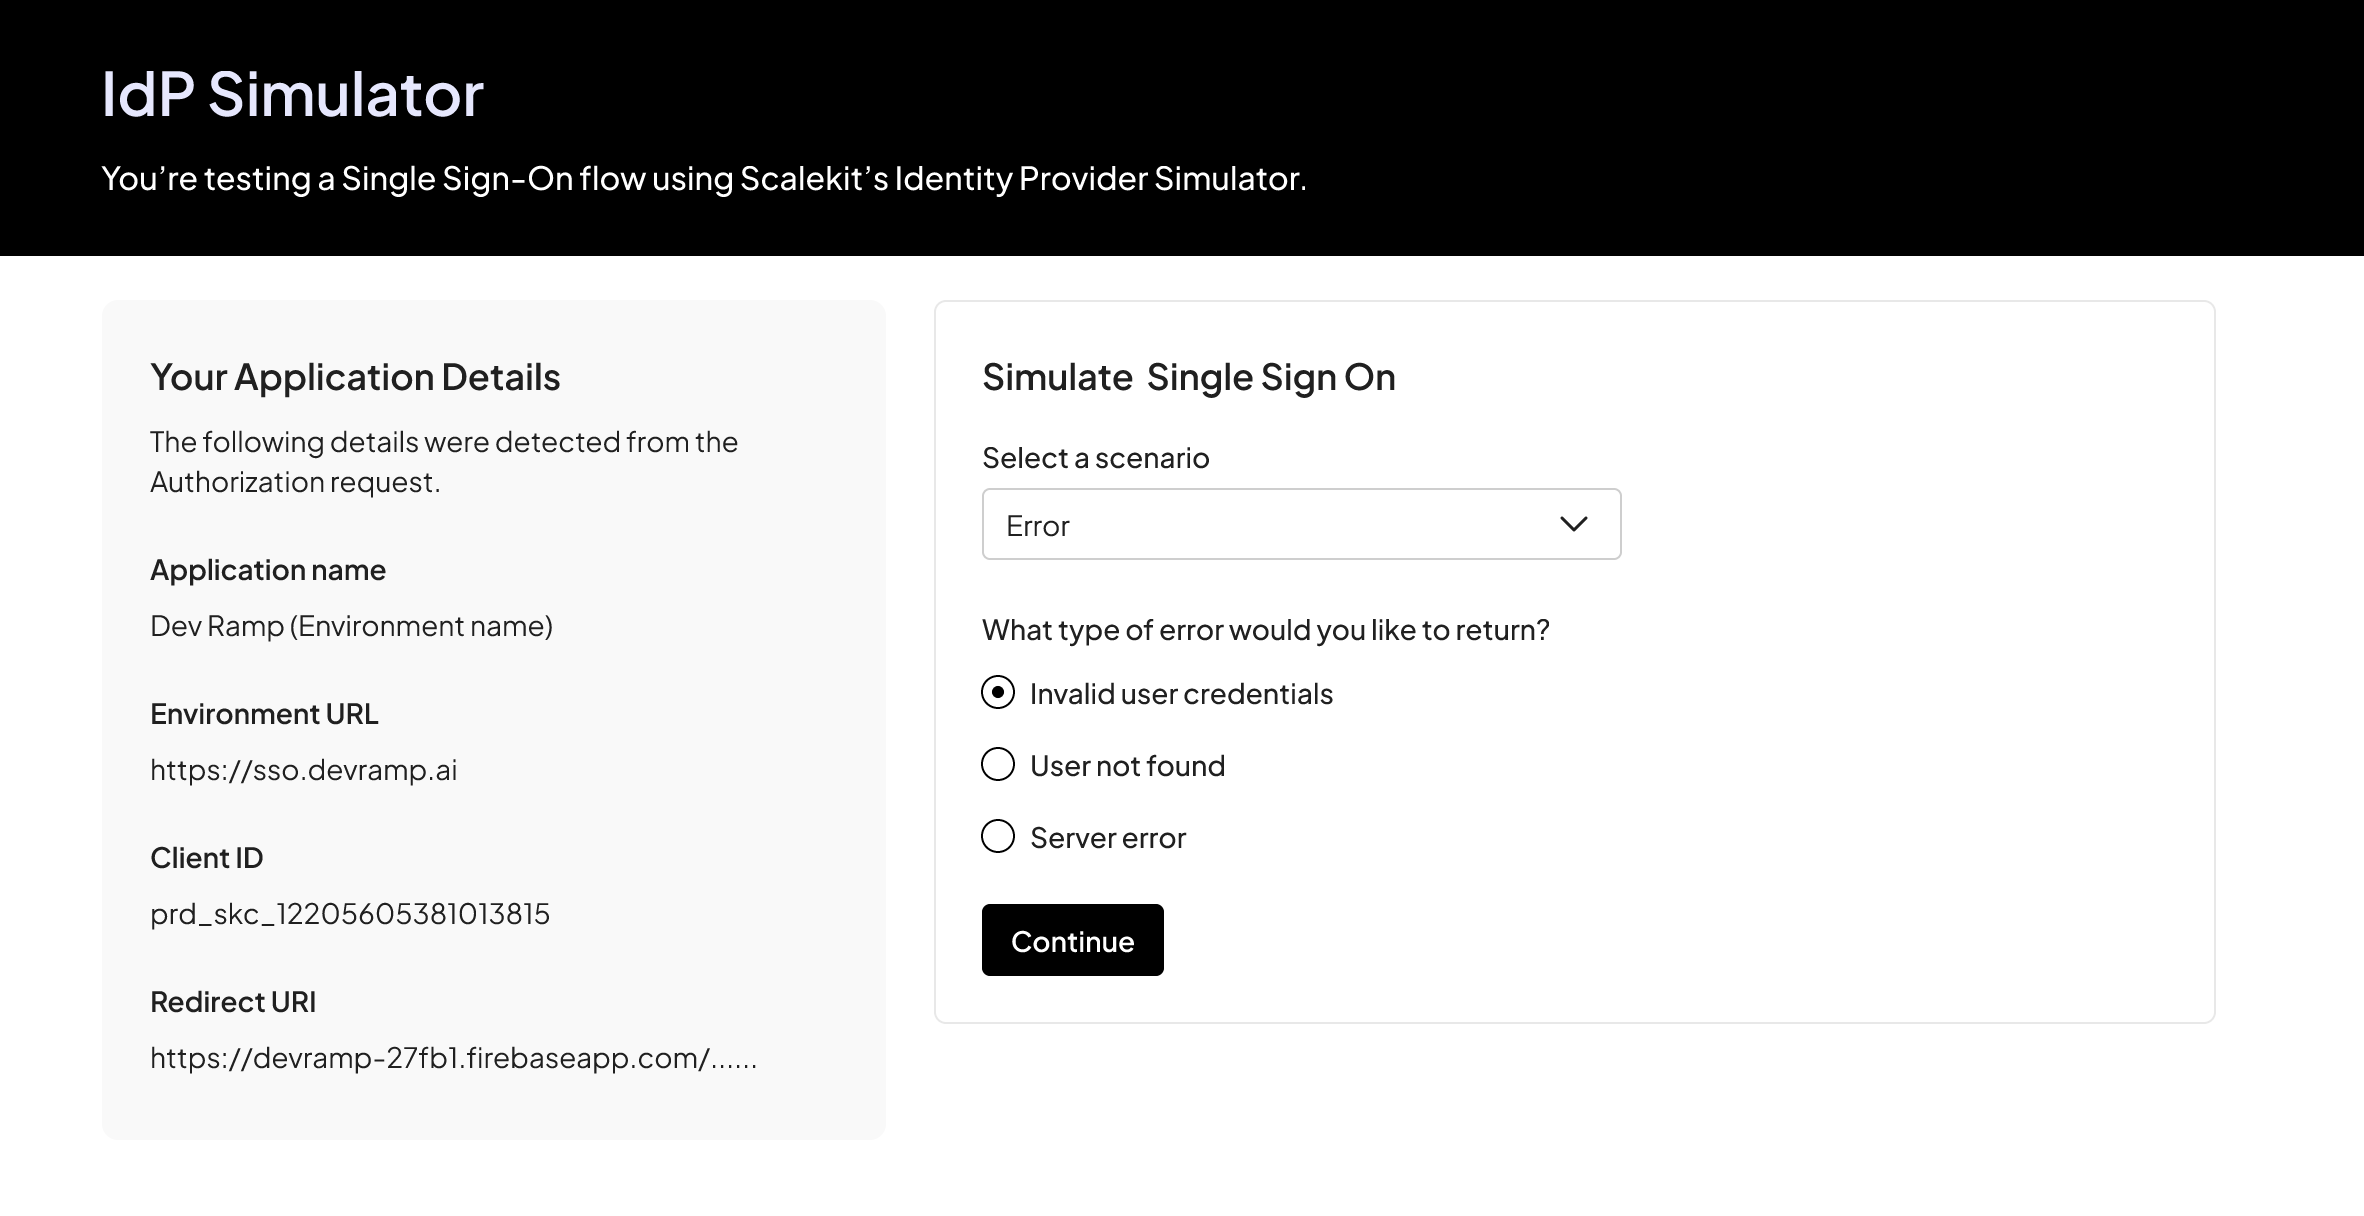
Test error scenarios
Section titled “Test error scenarios”- Generate and redirect to the authorization URL
- In the IdP Simulator, select Error from the dropdown menu
- Verify your callback handler processes the error correctly
- Ensure users see an appropriate error message
Testing with real identity providers Production-ready
Section titled “Testing with real identity providers ”After validating your SSO implementation with the IdP Simulator, test with real identity providers like Okta or Microsoft Entra ID to simulate actual customer scenarios. This ensures your integration works correctly with production identity systems.
Setup your test environment
Section titled “Setup your test environment”To simulate a real customer onboarding scenario, create a new organization with a real SSO connection:
- Create an organization at Dashboard > Organizations with a name that reflects a test customer
- Generate an Admin Portal link from the organization’s overview page
- Open the Admin Portal link and follow the integration guide to set up an SSO connection:
Service provider (SP) initiated SSO Scenario 1
Section titled “Service provider (SP) initiated SSO ”Test the most common SSO scenario where users start the authentication flow from your application’s login page.
Validate the flow
Section titled “Validate the flow”- Generate authorization URL: Create an authorization URL with your test organization’s ID (see Authorization URL documentation)
- User authentication: Verify that Scalekit redirects users to the correct identity provider
- Callback handling: Confirm your application receives the authorization code at your redirect URI
- Token exchange: Verify you can exchange the authorization code for user details and tokens
- Session creation: Ensure your application creates a session and logs the user in successfully
Your application should successfully retrieve user details including email, name, and any custom attributes configured in the SSO connection.
Identity provider (IdP) initiated SSO Scenario 2
Section titled “Identity provider (IdP) initiated SSO ”Test the scenario where users start authentication from their identity provider’s application catalog.
Validate the flow
Section titled “Validate the flow”- Initial callback: User is redirected to your default redirect URI with IdP-initiated request parameters
- Detection logic: Your application detects this as an IdP-initiated request (based on the request parameters)
- SP-initiated conversion: Your application initiates SP-initiated SSO by generating an authorization URL
- IdP redirect: User is redirected to the identity provider based on the authorization URL
- Final callback: After authentication, user is redirected back with an authorization code and state parameter
- Token exchange: Exchange the code for user details and complete the login
For implementation details, see our IdP-initiated SSO implementation guide.
Error handling Scenario 3
Section titled “Error handling ”Test how your application handles SSO failures. Common error scenarios include:
- Misconfigured SSO connections (wrong certificates, invalid metadata)
- Incomplete user profiles (missing required attributes)
- Expired or revoked SSO connections
- Network or integration issues with the identity provider
Validate error handling
Section titled “Validate error handling”- Review the SSO integration error codes documentation
- Test each applicable error scenario by intentionally misconfiguring your SSO connection
- Verify your application displays appropriate, user-friendly error messages
- Ensure errors are logged for debugging purposes
- Confirm users can retry authentication or contact support
Next steps
Section titled “Next steps”After thoroughly testing your SSO implementation:
- Review the SSO launch checklist to ensure production readiness
- Configure the Admin Portal for your customers to self-serve SSO setup
- Implement custom domain for a seamless branded experience
- Set up webhooks to receive real-time authentication events