Add OAuth 2.1 authorization to MCP servers
Secure your Model Context Protocol (MCP) servers with Scalekit's drop-in OAuth 2.1 authorization solution and protect your AI integrations
This guide shows you how to add production-ready OAuth 2.1 authorization to your Model Context Protocol (MCP) server using Scalekit. You’ll learn how to secure your MCP server so that only authenticated and authorized users can access your tools through AI hosts like Claude Desktop, Cursor, or VS Code.
See the integration in action
MCP servers expose tools that AI hosts can discover and execute to interact with your resources. For example:
- A sales team member could use Claude Desktop to view customer information, update records, or set follow-up reminders
- A developer could use VS Code or Cursor with a GitHub MCP server to perform everyday GitHub actions through chat
- A autonomous agent could use a MCP server to perform actions such as look up the account details in a CRM system
When you build MCP servers, multiple AI hosts may need to discover and use your server to interact with your resources. Scalekit handles the complex authentication and authorization for you, so you can focus on building better tools and improving functionality.
-
Get Scalekit SDK
Section titled “Get Scalekit SDK”To get started, make sure you have your Scalekit account and API credentials ready. If you haven’t created a Scalekit account yet, you can sign up and get a free account.
Next, install the Scalekit SDK
npm install @scalekit-sdk/nodepip install scalekit-sdk-pythonUse the Scalekit dashboard to register your MCP server and configure MCP hosts (or AI agents following the MCP client protocol) to use Scalekit as the authorization server. The Scalekit SDK is then used to validate tokens after users have been authenticated and authorized to access your MCP server.
-
Add MCP server to get drop-in OAuth2.1 authorization server
Section titled “Add MCP server to get drop-in OAuth2.1 authorization server”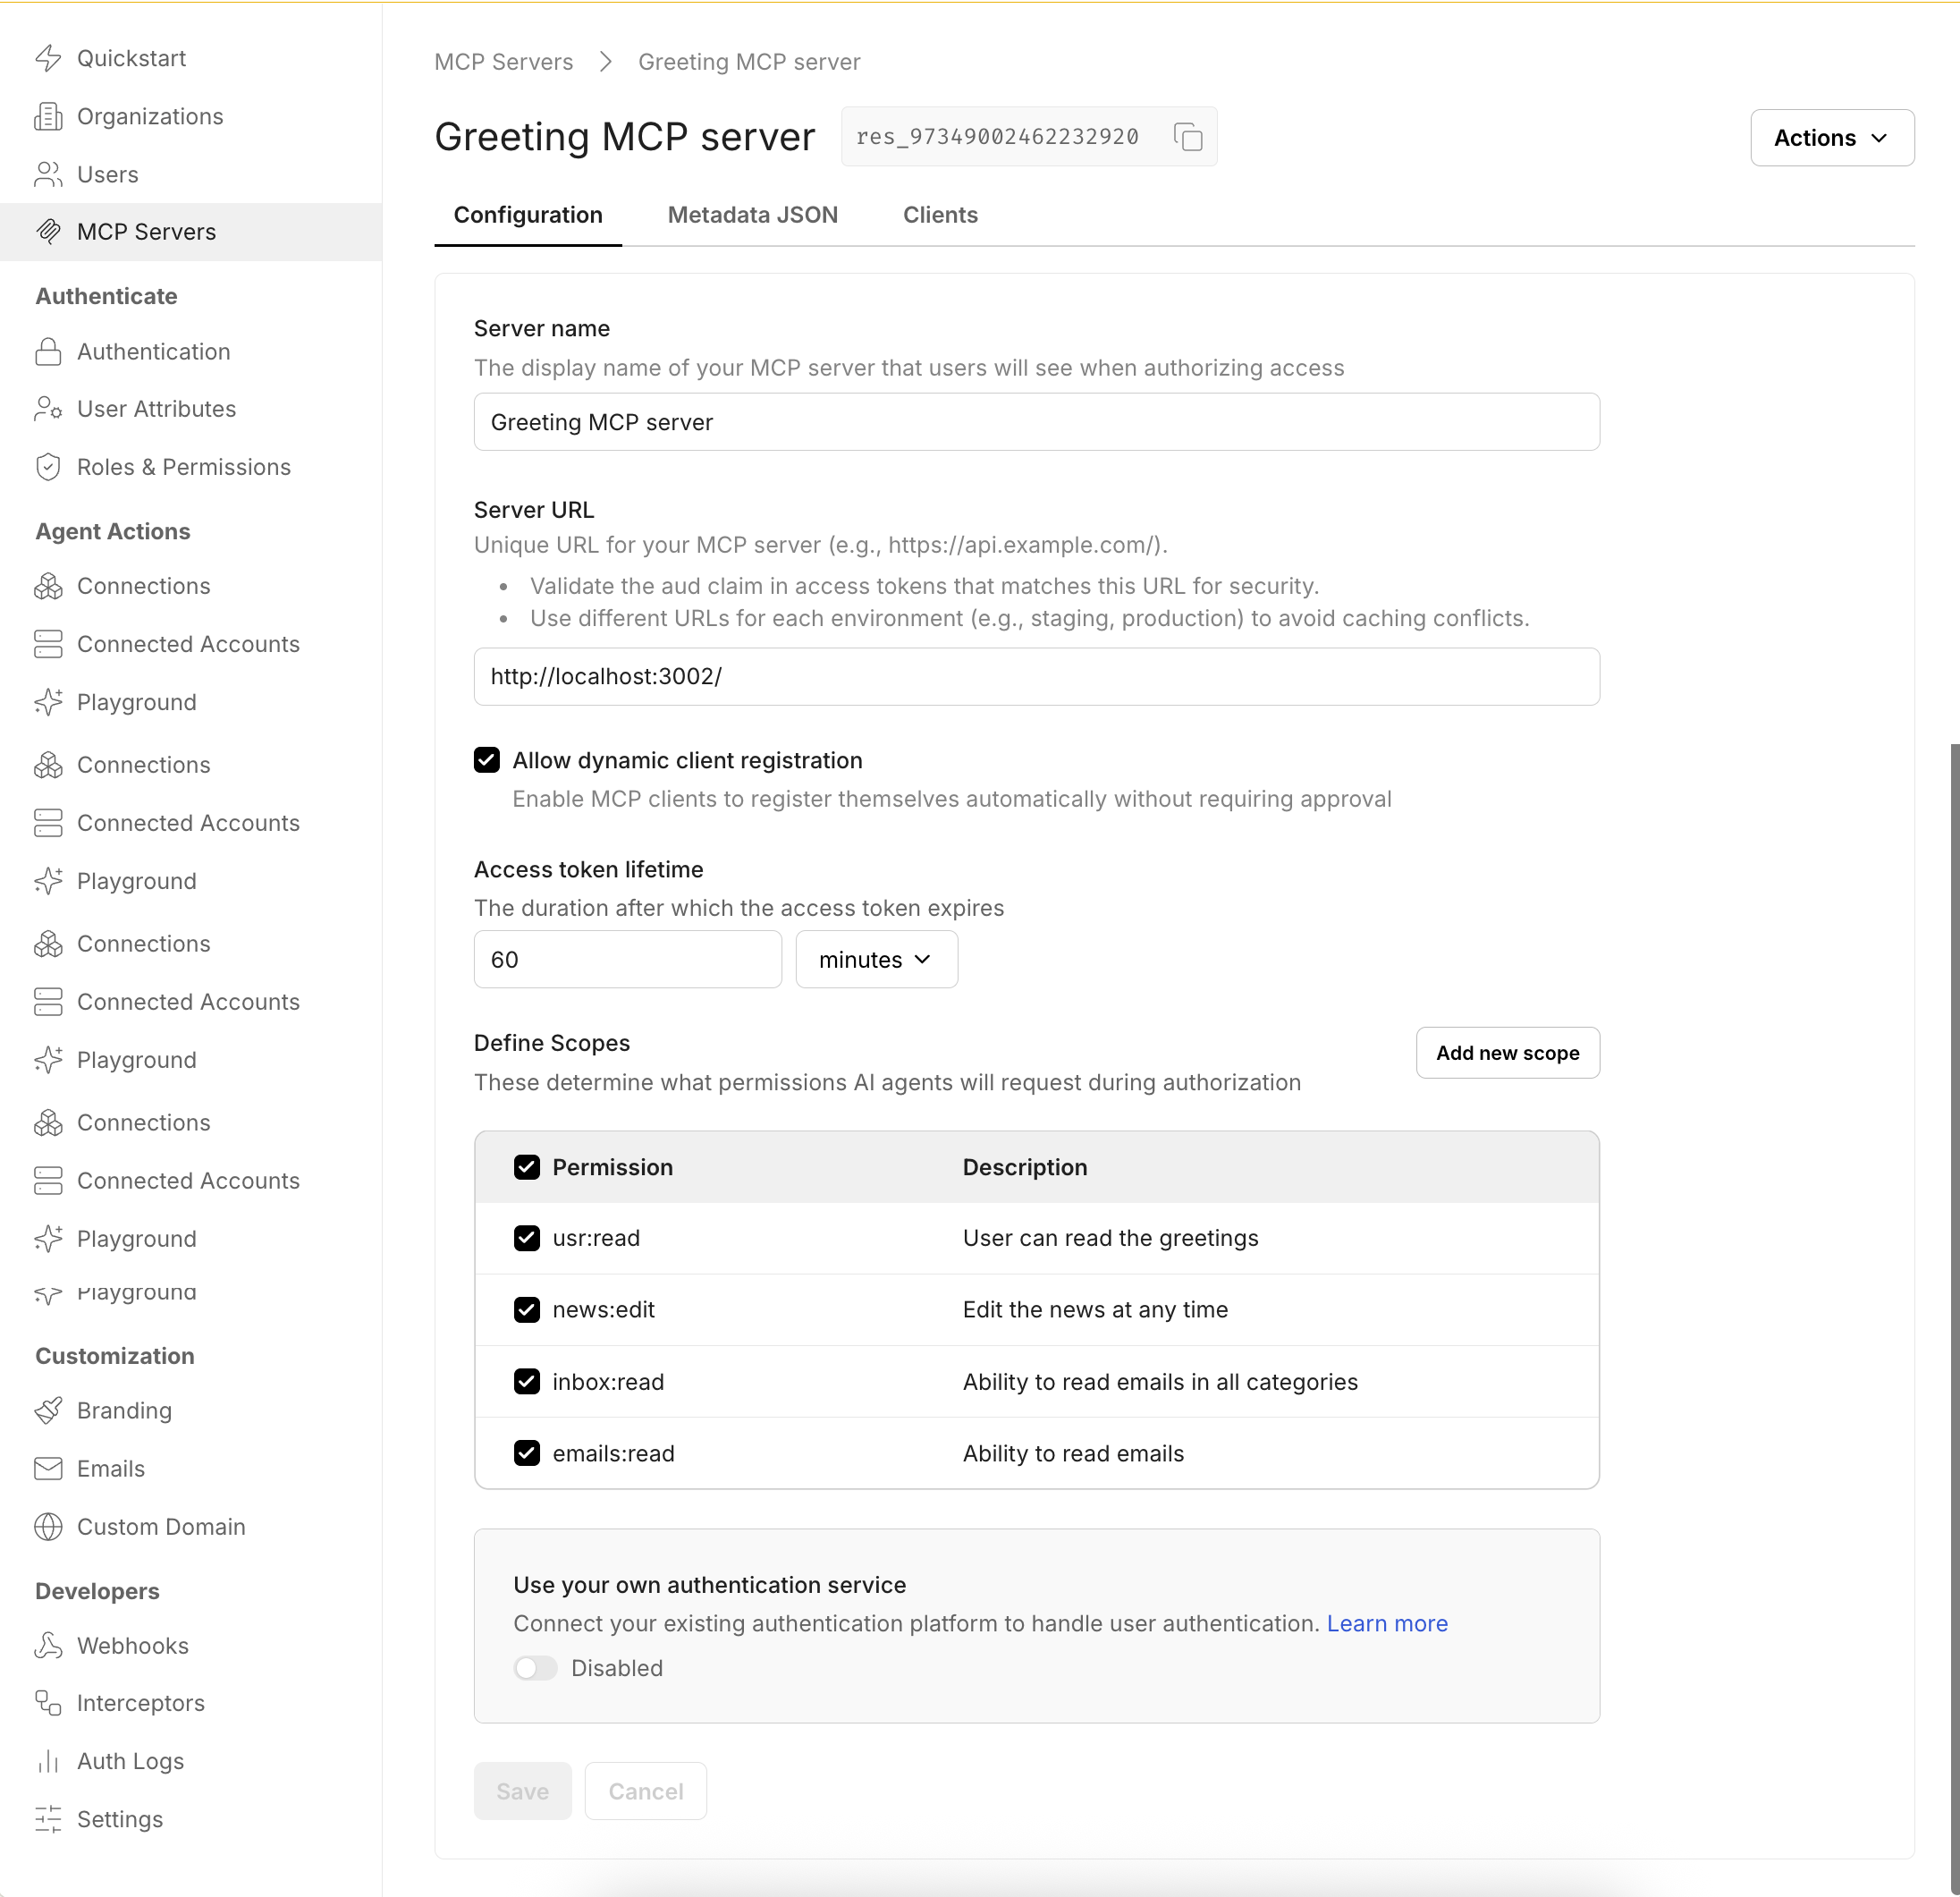
In the Scalekit dashboard, go to MCP servers and select Add MCP server.
- Provide a name for your MCP server to help you identify it easily. This name appears on the Consent page that MCP hosts display to users when authorizing access to your MCP server.
- Enter the Server URL where your MCP server is hosted. Scalekit includes this URL as the
audclaim in issued tokens, indicating that the token was intended for your specific MCP server. You can optionally validate this claim before allowing tool access or execution. - Enable dynamic client registration for MCP hosts. This allows MCP hosts to automatically register with Scalekit (and your authorization server), eliminating the need for manual registration and making it easier for users to adopt your MCP server securely.
- Define the scopes that MCP hosts can request for this MCP server. These scopes are pre-approved when users authenticate to use your MCP server, streamlining the authorization process.
-
Let MCP clients discover your OAuth2.1 authorization server
Section titled “Let MCP clients discover your OAuth2.1 authorization server”MCP protocol directs the any MCP client to discover your OAuth2.1 authorization server by calling a public endpoint on your MCP server. This endpoint is called
.well-known/oauth-protected-resourceand your MCP server is expected to host this endpoint.Copy the response from Dashboard > MCP Servers > Your server > Metadata JSON and implement it in your
.well-known/oauth-protected-resourceendpoint.// MCP client discovery endpointapp.get('/.well-known/oauth-protected-resource', (req, res) => {res.json({// From Scalekit dashboard > MCP servers"authorization_servers": ["https://<SCALEKIT_ENVIRONMENT_URL>/resources/<YOUR_RESOURCE_ID>"],"bearer_methods_supported": ["header" // Bearer token in Authorization header],"resource": "https://mcp.yourapp.com", // Your MCP server URL"resource_documentation": "https://mcp.yourapp.com/docs","scopes_supported": ["weather:read", "weather:write"] // Dashboard-configured scopes});});from fastapi import FastAPIfrom fastapi.responses import JSONResponseapp = FastAPI()# MCP client discovery endpoint@app.get("/.well-known/oauth-protected-resource")async def get_oauth_protected_resource():return JSONResponse({"authorization_servers": ["https://<SCALEKIT_ENVIRONMENT_URL>/resources/res_82829009141891595"],"bearer_methods_supported": ["header"],"resource": "https://mcp.yourapp.com","resource_documentation": "https://mcp.yourapp.com/docs","scopes_supported": ["weather:read", "weather:write"]})
-
Validate all MCP client requests have a valid access token
Section titled “Validate all MCP client requests have a valid access token”Your MCP server should validate that all incoming requests contain a valid access token. Leverage Scalekit SDKs to validate tokens and verify essential claims such as
aud(audience),iss(issuer),exp(expiration),iat(issued at), andscope(permissions).Set up the Scalekit client and configure your resource identifiers. Get these values from Dashboard > MCP servers > Your server.
auth-config.js 10 collapsed linesimport { Scalekit } from '@scalekit-sdk/node';// Initialize Scalekit client with environment credentials// Reference installation guide for client setup detailsconst scalekit = new Scalekit(process.env.SCALEKIT_ENVIRONMENT_URL,process.env.SCALEKIT_CLIENT_ID,process.env.SCALEKIT_CLIENT_SECRET);// Resource configuration// Get these values from Scalekit dashboard > MCP servers > Your serverconst RESOURCE_ID = 'https://your-mcp-server.com';const METADATA_ENDPOINT = 'https://your-mcp-server.com/.well-known/oauth-protected-resource';// WWW-Authenticate header for unauthorized responses// This helps clients understand how to authenticate properlyexport const WWWHeader = {HeaderKey: 'WWW-Authenticate',HeaderValue: `Bearer realm="OAuth", resource_metadata="${METADATA_ENDPOINT}"`};auth_config.py 12 collapsed linesfrom scalekit import ScalekitClientfrom scalekit.common.scalekit import TokenValidationOptionsimport os# Initialize Scalekit client with environment credentials# Reference installation guide for client setup detailsscalekit_client = ScalekitClient(env_url=os.getenv("SCALEKIT_ENVIRONMENT_URL"),client_id=os.getenv("SCALEKIT_CLIENT_ID"),client_secret=os.getenv("SCALEKIT_CLIENT_SECRET"))# Resource configuration# Get these values from Scalekit dashboard > MCP servers > Your serverRESOURCE_ID = "https://your-mcp-server.com"METADATA_ENDPOINT = "https://your-mcp-server.com/.well-known/oauth-protected-resource"# WWW-Authenticate header for unauthorized responses# This helps clients understand how to authenticate properlyWWW_HEADER = {"WWW-Authenticate": f'Bearer realm="OAuth", resource_metadata="{METADATA_ENDPOINT}"'}Extract the Bearer token from incoming MCP client requests. MCP clients send tokens in the
Authorization: Bearer <token>header format.// Extract Bearer token from Authorization header// Use case: Validate requests from AI hosts like Claude Desktop, Cursor, or VS Codeconst authHeader = req.headers['authorization'];const token = authHeader?.startsWith('Bearer ')? authHeader.split('Bearer ')[1]?.trim(): null;if (!token) {throw new Error('Missing or invalid Bearer token');}# Extract Bearer token from Authorization header# Use case: Validate requests from AI hosts like Claude Desktop, Cursor, or VS Codeauth_header = request.headers.get("Authorization", "")token = Noneif auth_header.startswith("Bearer "):token = auth_header.split("Bearer ")[1].strip()if not token:raise ValueError("Missing or invalid Bearer token")Validate the token against your configured resource audience to ensure it was issued for your specific MCP server.
Validate token // Security: Validate token against configured resource audience// This ensures the token was issued for your specific MCP serverawait scalekit.validateToken(token, {audience: [RESOURCE_ID]});Validate token # Security: Validate token against configured resource audience# This ensures the token was issued for your specific MCP serveroptions = TokenValidationOptions(issuer=os.getenv("SCALEKIT_ENVIRONMENT_URL"),audience=[RESOURCE_ID])scalekit_client.validate_token(token, options=options)Complete middleware implementation
Section titled “Complete middleware implementation”Combine token extraction and validation into a complete authentication middleware that protects all your MCP endpoints.
import { Scalekit } from '@scalekit-sdk/node';import { NextFunction, Request, Response } from 'express';const scalekit = new Scalekit(process.env.SCALEKIT_ENVIRONMENT_URL,process.env.SCALEKIT_CLIENT_ID,process.env.SCALEKIT_CLIENT_SECRET);const RESOURCE_ID = 'https://your-mcp-server.com';const METADATA_ENDPOINT = 'https://your-mcp-server.com/.well-known/oauth-protected-resource';export const WWWHeader = {HeaderKey: 'WWW-Authenticate',HeaderValue: `Bearer realm="OAuth", resource_metadata="${METADATA_ENDPOINT}"`};export async function authMiddleware(req: Request, res: Response, next: NextFunction) {try {// Security: Allow public access to well-known endpoints for metadata discovery// This enables MCP clients to discover your OAuth configurationif (req.path.includes('.well-known')) {return next();}// Extract Bearer token from Authorization headerconst authHeader = req.headers['authorization'];const token = authHeader?.startsWith('Bearer ')? authHeader.split('Bearer ')[1]?.trim(): null;if (!token) {throw new Error('Missing or invalid Bearer token');}// Security: Validate token against configured resource audienceawait scalekit.validateToken(token, {audience: [RESOURCE_ID]});next();} catch (err) {// Return proper OAuth 2.0 error response with WWW-Authenticate headerreturn res.status(401).set(WWWHeader.HeaderKey, WWWHeader.HeaderValue).end();}}// Apply authentication middleware to all MCP endpointsapp.use('/', authMiddleware);from scalekit import ScalekitClientfrom scalekit.common.scalekit import TokenValidationOptionsfrom fastapi import Request, HTTPException, statusfrom fastapi.responses import Responseimport osscalekit_client = ScalekitClient(env_url=os.getenv("SCALEKIT_ENVIRONMENT_URL"),client_id=os.getenv("SCALEKIT_CLIENT_ID"),client_secret=os.getenv("SCALEKIT_CLIENT_SECRET"))RESOURCE_ID = "https://your-mcp-server.com"METADATA_ENDPOINT = "https://your-mcp-server.com/.well-known/oauth-protected-resource"# WWW-Authenticate header for unauthorized responsesWWW_HEADER = {"WWW-Authenticate": f'Bearer realm="OAuth", resource_metadata="{METADATA_ENDPOINT}"'}async def auth_middleware(request: Request, call_next):# Security: Allow public access to well-known endpoints for metadata discoveryif request.url.path.startswith("/.well-known"):return await call_next(request)# Extract Bearer token from Authorization headerauth_header = request.headers.get("Authorization", "")token = Noneif auth_header.startswith("Bearer "):token = auth_header.split("Bearer ")[1].strip()if not token:raise HTTPException(status_code=status.HTTP_401_UNAUTHORIZED,headers=WWW_HEADER)# Security: Validate token against configured resource audiencetry:options = TokenValidationOptions(issuer=os.getenv("SCALEKIT_ENVIRONMENT_URL"),audience=[RESOURCE_ID])scalekit_client.validate_token(token, options=options)except Exception:raise HTTPException(status_code=status.HTTP_401_UNAUTHORIZED,headers=WWW_HEADER)return await call_next(request)# Apply authentication middleware to all MCP endpointsapp.middleware("http")(auth_middleware) -
Implement scope-based tool authorization
Section titled “Implement scope-based tool authorization”Add scope validation at the MCP tool execution level to ensure tools are only executed when the user has authorized the MCP client with the required permissions. This provides fine-grained access control and follows the principle of least privilege.
// Security: Validate token has required scope for this specific tool execution// Use case: Ensure users only have access to authorized MCP toolstry {await scalekit.validateToken(token, {audience: [RESOURCE_ID],requiredScopes: [scope]});} catch(error) {// Return OAuth 2.0 compliant error for insufficient scopereturn res.status(403).json({error: 'insufficient_scope',error_description: `Required scope: ${scope}`,scope: scope});}# Security: Validate token has required scope for this specific tool execution# Use case: Ensure users only have access to authorized MCP toolstry:scalekit_client.validate_access_token(token,options=TokenValidationOptions(audience=[RESOURCE_ID],required_scopes=[scope]))except ScalekitValidateTokenFailureException as ex:# Return OAuth 2.0 compliant error for insufficient scopereturn {"error": "insufficient_scope","error_description": f"Required scope: {scope}","scope": scope} -
Enable additional authentication methods
Section titled “Enable additional authentication methods”Beyond the OAuth 2.1 authorization you’ve implemented, you can enable additional authentication methods that work seamlessly with your MCP server’s token validation:
Enable organizations to authenticate through their identity providers (Okta, Azure AD, Google Workspace). Your MCP server continues validating tokens the same way, while Scalekit handles:
- Centralized access control through existing enterprise identity systems
- Single sign-on experience for organization members
- Compliance with corporate security policies
Allow users to authenticate via Google, GitHub, Microsoft, and other social providers. Your existing token validation logic remains unchanged while providing:
- Quick onboarding for individual users
- Familiar authentication experience
- Reduced friction for personal and small team use cases
These authentication methods require no changes to your MCP server implementation—you continue validating tokens exactly as shown in the previous steps.
Your MCP server now has production-ready OAuth 2.1 authorization! You’ve successfully implemented a secure authorization flow that protects your MCP tools and ensures only authenticated users can access them through AI hosts.
Try the demo: Download and run our sample MCP server with authentication already configured to see the complete integration in action.
In summary,
Scalekit OAuth authorization server
Acts as the identity provider for your MCP server.
- Authenticates users and agents
- Issues access tokens with fine-grained scopes
- Manages OAuth 2.1 flows (authorization code, client credentials)
- Supports dynamic client registration for easy onboarding
Your MCP server
Validates incoming access tokens and enforces the permissions encoded in each token. Only requests with valid, authorized tokens are allowed.
This separation of responsibilities ensures a clear boundary: Scalekit handles identity and token issuance, while your MCP server focuses on business logic of executing the actual tool calls.